My 2p about ERP Solutions, Information Worker Solutions and other software products (mainly Microsoft Dynamics AX and Microsoft SharePoint).
Showing posts with label SharePoint. Show all posts

05 January 2011

Enterprise Portal: Generate proxies

Problem description:

Upon deploying proxies (Tools > Development Tools > Web development > Proxies > Generate), I ran into following error: ClrObject static method invocation error.

Solution: Specify manually the proxies Directory

The problem is apparently that the process wasn’t able to find the directory for deploying the proxies. So I specified the directory manually and pressed the second Generate button on the form (in group File System Directory) and everything ran fine.

In most cases the proxies directory will look like this: C:\inetpub\wwwroot\wss\VirtualDirectories\80\App_Code\Proxies.


Continue reading......

by Patrik Luca 0 comments

30 September 2009

Links List September 2009

I decided to share all my interesting reads and resources month by month with my blog readers. You can find these posts by searching on the label Links. I'll try to order the resources in logical categories. If you would like to see some interesting stuff added in the next month, don't hesitate to post a comment.

So this is my Links post for September 2009.

SharePoint – General

SharePoint - Design and Customization

Dynamics AX

Freeware


Continue reading......

by Patrik Luca 0 comments

03 September 2009

Integration MOSS 2007 – Dynamics AX with BDC through a custom field type (part 3)

Introduction

In this series of post, I’ll show how you can integrate Microsoft Office SharePoint Server 2007 with another line of business system, more specifically Dynamics AX.

The purpose is to create a custom field type, which can be added as a column to a SharePoint list. This SharePoint column renders a dropdown box with values from a Microsoft SQL Server table’s column. As such, in stead of duplicating the possible values on your SharePoint box each time new values are added in your line of business system, the available values for this SharePoint column are always in synch with your line of business system.

This first post describes how to create your connection between Microsoft Office SharePoint Server 2007 and Dynamics AX.

The second post describes how to create the custom field type.

Currently however, the DAX project activities we are receiving in our dropdown list are based on a specific project.

In this post, I’ll describe how to receive those project activities for a project depending on the site the issue list is part of.

Preparation

Suppose you have created a Subsite for all your projects (called Projects) under the top level Web Site. For each project, you’ve created a specific Subsite under the Projects Subsite.

What we’ll need first, is that we can link this Subsite to a Dynamics AX ProjId. To achieve this, set the URL name of eacht Project Subsite to <ProjId>_<dataAreaId>. So the url should look like http://<webapplication>/projects/<ProjId>_<dataAreaId>.

Adapt the Field Rendering Control

In the Field Rendering Control DAXProjActivityTxtFieldControl.cs we’ve created a method PopulateDAXProjActivityTxts. In this method, we used two arguments, being the ProjId and the dataAreaId, which we gave a hardcoded value. We are going to make this values depending on our url.

  1. First of all we need to add an additional using statement to be able to use the SPWeb Class.:
    using Microsoft.SharePoint;


  2. In the method PopulateDAXProjActivityTxts, look for the lines where we set a value for the arguments passed to our SQL query (args[0] = …). Replace those lines with the following code:


    //return the Web site of the current request
    SPWeb web = SPContext.Current.Web;
    // url of the Web site
    string path = web.Url;
    Uri uri = new Uri(path);
    // get part of url where ProjId and dataAreaId are stored
    string proj = uri.Segments.GetValue(2).ToString();
    char[] splitter = { '_' };
    string[] splittedproj = proj.Split(splitter);
    // ProjId
    args[0] = splittedproj[0];
    // dataAreaId
    args[1] = splittedproj[1];


  3. Build your Visual Studio project: the post-build events added previously will install everything needed to your SharePoint environment.


Result


When you create or edit an item in the list, your drop down column will be loaded with values from your Microsoft Dynamics AX source: but now those values will be variable: they’ll depend upon the part of your url where you created the link with your ProjId and dataAreaId.


Continue reading......

by Patrik Luca 0 comments

31 August 2009

Links List August 2009

I decided to share all my interesting reads and resources month by month with my blog readers. You can find these posts by searching on the label Links. I'll try to order the resources in logical categories. If you would like to see some interesting stuff added in the next month, don't hesitate to post a comment.

So this is my Links post for August 2009.

SharePoint - Design and Customization

Dynamics AX


Continue reading......

by Patrik Luca 0 comments

28 August 2009

The path or file name is invalid error when opening Office document in a SharePoint library

Problem Description: The path or file name is invalid

You browse to a SharePoint document library and when you click on the Name of a Microsoft Office PowerPoint file stored in the library, you receive following error: The path or file name for http://servername/libraryurl/filename.pptx is invalid. Please check that the path and file name are correct. Your PowerPoint application starts automatically up on your desktop, but the file isn’t opened: however, yesterday everything worked fine…

What is even weirder, if you do a search for the document and you click on its name in the search results, your PowerPoint application starts and the file opens without problem.

What is also remarkable: if you go to your document library and you choose Edit in Microsoft Office PowerPoint, your PowerPoint application starts, the file gets checked out automatically and opens without error.

Solution: open the document via PowerPoint directly

  1. Start Microsoft Office PowerPoint 2007 on your desktop.
  2. Click the Microsoft Office Button in the upper left of the screen.
  3. Choose Open.
  4. Enter the url of the SharePoint document library in the File name box. (Remark: make sure it is the url of the library and not the url of the PowerPoint filename which fails to open, because this won’t fix the problem)
  5. All files stored in the document library will be shown in the right part of the Open file pop-up window.
  6. Choose the PowerPoint file: it will open in your PowerPoint application.
  7. Close your PowerPoint application.

If you now go back to the SharePoint document libary with Internet Explorer, you’ll be able to open PowerPoint files stored in it, by merely clicking their Name in Internet Explorer.

I really don’t know why the problem suddenly arises, nor why it is solved by following the procedure described above, but it solves the problem…

I experienced also that you have to do this procedure for each SharePoint document library having the problem. But you have to do it only once per library: if you do it for one PowerPoint slideshow in the library, all others will open again without error.


Continue reading......

by Patrik Luca 2 comments

31 July 2009

Links List July 2009

I decided to share all my interesting reads and resources month by month with my blog readers. You can find these posts by searching on the label Links. I'll try to order the resources in logical categories. If you would like to see some interesting stuff added in the next month, don't hesitate to post a comment.

So this is my Links post for July 2009.

SharePoint - Design and Customization

SharePoint – Business Data Catalog

Dynamics AX

Blogging – Blogging Tips


Continue reading......

by Patrik Luca 0 comments

20 July 2009

Integration MOSS 2007 – Dynamics AX with BDC through a custom field type (part 2)

Introduction

In this series of post, I’ll show how you can integrate Microsoft Office SharePoint Server 2007 with another line of business system, more specifically Dynamics AX.

The purpose is to create a custom field type, which can be added as a column to a SharePoint list. This SharePoint column renders a dropdown box with values from a Microsoft SQL Server table’s column. As such, in stead of duplicating the possible values on your SharePoint box each time new values are added in your line of business system, the available values for this SharePoint column are always in synch with your line of business system.

This first post describes how to create your connection between Microsoft Office SharePoint Server 2007 and Dynamics AX.

In this post, I’ll describe how to create the custom field type.

In a following post, I’ll describe how to make this custom field type more generic by using a dynamic where clause in the query.

Preparation

  1. In Visual Studio, select External Tools from the Tools menu.
  2. In the External Tools dialog, click Add and enter Get Assembly Public Key for the Title.
  3. Fill the Command textbox by browsing to C:\Program Files\Microsoft Visual Studio 8\SDK\v2.0\Bin\sn.exe.
  4. In the Arguments textbox, type the following (case sensitive) –Tp $(TargetPath).
  5. Enable the Use Output window checkbox.
  6. Click OK. The new command is added to the Tools menu.

See also: Prepare for Development of Custom Field Rendering Controls.

Create a Visual Studio project

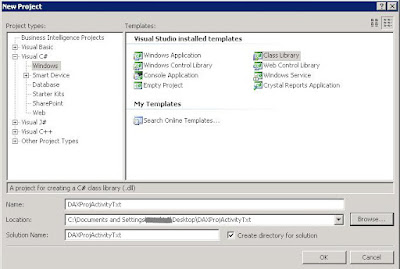
  1. Create a Class Library project with Microsoft Visual Studio 2005.

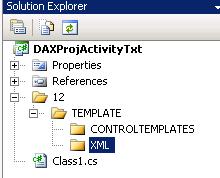
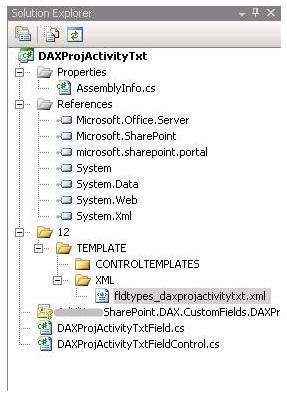
  2. Create a folder structure in your project.

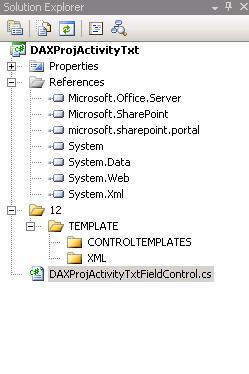
  3. Add a reference to the System.Web dll (add it by selecting it in the .NET tab page) and the dlls: Microsoft.Office.Server, Microsoft.SharePoint and microsoft.sharepoint.portal (add them by browsing to C:\Program Files\Common Files\Microsoft Shared\web server extensions\12\ISAPI to find it).

  4. Right-click the project name in Solution Explorer and select Properties.
  5. On the Application tab of the Properties dialog, enter MyCompany.SharePoint.DAX.CustomFields as the Default namespace and MyCompany.SharePoint.DAX.CustomFields.DAXProjActivityTxt as the Assembly name.
  6. Open the Signing tab and the select Sign the assembly.
  7. Choose <New…> from the Choose a strong name key file drop-down list box.
  8. In the Create Strong Name Key dialog, type MyCompany.SharePoint.DAX.CustomFields.DAXProjActivityTxt in the Key file name box, and then be sure that the Protect … check box is not checked. Click OK.
  9. Open the Build Events tab and type the following in the Post-build event command line box.
    cd "$(ProjectDir)"
    "%programfiles%\microsoft visual studio 8\sdk\
    v2.0\bin\gacutil" /i "$(TargetPath)" /nologo /f
    %systemroot%\system32\iisapp.vbs /a
    "SharePoint_App_Pool" /r
    xcopy *.ascx
    "C:\Program Files\Common Files\Microsoft Shared\
    web server extensions\12\TEMPLATE\CONTROLTEMPLATES\"
    /y
    xcopy 12\Template\xml\fldtypes*.xml
    "C:\Program Files\Common Files\Microsoft Shared\
    web server extensions\12\TEMPLATE\XML\" /y

  10. SharePoint_App_Pool with the actual name of the Internet Information Server (IIS) Application Pool that is assigned to your Windows SharePoint Services Web Application.

See also: To set up the custom field project.


Create the Field Rendering Control


  1. Create the Field Rendering Control, to render your custom field in New mode or Edit mode (see Field Rendering Controls). Rename the Class1.cs file to DAXProjActivityTxtFieldControl.cs.

  2. Edit the DAXProjActivityTxtFieldControl.cs and change the namespace to MyCompany.SharePoint.DAX.CustomFields.

  3. Add the necessary using statements:

    using System.Web.UI;
    using System.Web.UI.WebControls;
    using System.Web.UI.HtmlControls;
    using Microsoft.SharePoint.WebControls;
    using Microsoft.Office.Server.ApplicationRegistry.MetadataModel;
    using Microsoft.Office.Server.ApplicationRegistry.SystemSpecific.Db;
  4. Replace the Class declaration with the following code:

    public class DAXProjActivityTxtFieldControl : TextField
    {
    }
  5. Add following code lines to define the controls:
    private DropDownList DAXProjActivityTxtDropDownList;
    private HtmlTable table;
  6. Add the following override of the CreateChildControls method.

    protected override void CreateChildControls()
    {
    base.CreateChildControls();
    this.table = new HtmlTable();
    HtmlTableRow row = new HtmlTableRow();
    table.Rows.Add(row);
    HtmlTableCell cell = null;
    DAXProjActivityTxtDropDownList
    = TemplateContainer.FindControl(
    "DAXProjActivityTxtDropDownList")
    as DropDownList;
    if (DAXProjActivityTxtDropDownList == null)
    throw new ArgumentException("Activity
    dropdown list not found.
    Please check if your control
    template is valid.");

    if (this.ControlMode == SPControlMode.Edit ||
    this.ControlMode == SPControlMode.New)
    {
    row = new HtmlTableRow();
    cell = new HtmlTableCell();
    this.DAXProjActivityTxtDropDownList =
    new DropDownList();
    DAXProjActivityTxtDropDownList.ToolTip =
    "Enter Activity";
    DAXProjActivityTxtDropDownList.Width = 255;
    PopulateDAXProjActivityTxts(Guid.Empty.ToString());
    string currentValue = (string)this.ItemFieldValue;

    if (currentValue != null &
    currentValue != string.Empty)
    {
    this.DAXProjActivityTxtDropDownList.SelectedValue
    = currentValue;
    }
    else if
    (this.DAXProjActivityTxtDropDownList.Items.Count
    > 0)
    {
    this.DAXProjActivityTxtDropDownList.SelectedValue
    = "";
    }

    cell.Controls.Add(this.DAXProjActivityTxtDropDownList);
    row.Cells.Add(cell);
    table.Rows.Add(row);

    }

    LiteralControl literalControl = new LiteralControl();
    cell = new HtmlTableCell();
    cell.ColSpan = 4;

    if (this.ControlMode == SPControlMode.Display)
    {
    literalControl.Text
    = "<p id='SPFieldChoice'
    style='visibility:visible;
    font-size:11; margin-bottom:-3;
    margin-top:-3'>"
    + this.ItemFieldValue + "</p>";
    }

    cell.Controls.Add(literalControl);
    row.Cells.Add(cell);
    table.Rows.Add(row);
    base.Controls.Add(table);
    }
  7. Add the following code to update the underlying value of the field to the latest user-set value:

    public override void UpdateFieldValueInItem()
    {
    this.EnsureChildControls();

    try
    {
    this.Value =
    this.DAXProjActivityTxtDropDownList.SelectedValue;
    this.ItemFieldValue = this.Value;
    }
    catch
    {
    ;
    }
    }
  8. Add a method which uses the Business Data Catalog object model to populate the dropdown list with activities:

    private void PopulateDAXProjActivityTxts(string partName)
    {
    //connect to the LobSystemInstance that represents
    //the DAX Activities business application in the BDC
    NamedLobSystemInstanceDictionary instances
    = ApplicationRegistry.GetLobSystemInstances();
    LobSystemInstance instance = instances["Your_Instance"];

    // Connect to the DAX Activity entity
    Entity entity
    = instance.GetEntities()
    ["[Your_DB].[dbo].[PROJACTIVITY]"];

    Method method
    = entity.GetMethods()
    ["FindByProjId_[Your_DB].[dbo].[PROJACTIVITY]"];

    MethodInstance methodinstance
    = method.GetMethodInstances()
    ["FindByProjId_[Your_DB].[dbo].
    [PROJACTIVITY]_Instance"];
    Object[] args
    = methodinstance.GetMethod().
    CreateDefaultParameterInstances(methodinstance);
    args[0] = “your projid”;
    args[1] = “your dataareaid”;
    DbEntityInstanceEnumerator daxprojactivitytxts
    = (DbEntityInstanceEnumerator)entity.Execute(
    methodinstance, instance, ref args);

    // loop through the activities
    // and populate the activities dropdown
    while (daxprojactivitytxts.MoveNext())
    {
    DbEntityInstance daxprojactivitytxt
    = (DbEntityInstance)daxprojactivitytxts.Current;
    DAXProjActivityTxtDropDownList.Items.Add(
    new ListItem(
    daxprojactivitytxt.GetFormatted("TXT").ToString()));
    }
    daxprojactivitytxts.Dispose();
    }
  9. Add the following override of the Render method.
    protected override void Render(HtmlTextWriter output)
    {
    this.table.RenderControl(output);
    }

Create the Custom Field Class


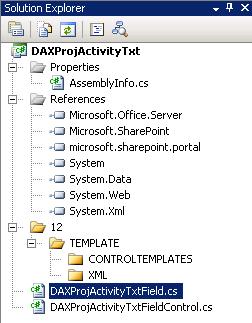
  1. Add a new class to the root of the project called DAXProjActivityTxtField.cs.


  2. Edit the DAXProjActivityTxtField.cs and change the namespace to MyCompany.SharePoint.DAX.CustomFields.
  3. Add the necessary using statements:

    using Microsoft.SharePoint;
    using Microsoft.SharePoint.WebControls;
  4. Let the class derive from SPFieldText.

    public class DAXProjActivityTxtField : 
    Microsoft.SharePoint.SPFieldText
  5. Implement two required constructors:

    public DAXProjActivityTxtField(
    SPFieldCollection fields, string fieldName)
    : base(fields, fieldName)
    {
    }

    public DAXProjActivityTxtField(
    SPFieldCollection fields, string typeName,
    string displayName)
    : base(fields, typeName, displayName)
    {
    }
  6. Override the FieldRenderingControl as follows:

    public override BaseFieldControl FieldRenderingControl
    {
    get
    {
    BaseFieldControl control =
    new DAXProjActivityTxtFieldControl();
    control.FieldName = this.InternalName;
    return control;
    }
    }

Create the Field Type definition


  1. Add a new XML File in the folder XML of your project folder structure, called fldtypes_daxprojactivitytxt.xml.


  2. Edit the file by entering following lines:

    <?xml version="1.0" encoding="utf-8" ?>
    <fieldtypes>
    <fieldtype>
    <field name="TypeName">DAXProjActivityTxt</field>
    <field name="ParentType">Text</field>
    <field name="TypeDisplayName">DAX ProjActivityTxt</field>
    <field name="TypeShortDescription">DAX project activity cust fld.</field>
    <field name="UserCreatable">TRUE</field>
    <field name="FieldTypeClass">
    MyCompany.SharePoint.DAX.CustomFields.DAXProjActivityTxtField,
    MyCompany.SharePoint.DAX.CustomFields.DAXProjActivityTxt,
    Version=1.0.0.0, Culture=neutral, PublicKeyToken=cf2f0bd24cc4b888</field>
    </fieldtype>
    </fieldtypes>
  3. Replace MyCompany with the same value as done in the replacement of the namespaces. Replace the value for the PublicKeyToken with the value you receive by executing the previously created External Tool in Visual Studio (Tools > Get Assembly Public Key)

Build the Visual Studio project


Build your Visual Studio project: the post-build events added previously will install everything needed to your SharePoint environment.


Add column to list


Add a SharePoint column to one of your SharePoint lists or create a site column: you’ll have a new type of information option. Choose it for the column you are creating.


Set Permission


You need to give the appropriate permissions to the SharePoint users who need to be able to edit the values in this column. Open SharePoint Central Administration, go to your Shared Service Provider and choose View applications in the  Business Data Catalog section. Select your previously created Application and choose Manage Permissions. Give the SharePoint users Execute Right on the Application.


Result


When you create or edit an item in the list, your drop down column will be loaded with values from your Microsoft Dynamics AX source and should look like below:


Interesting resources


Continue reading......

by Patrik Luca 14 comments

30 June 2009

Links List June 2009

I decided to share all my interesting reads and resources month by month with my blog readers. You can find these posts by searching on the label Links. I'll try to order the resources in logical categories. If you would like to see some interesting stuff added in the next month, don't hesitate to post a comment.

So this is my Links post for June 2009.

SharePoint - Design and Customization


Dynamics AX


  • Code Snippets—Sample Jobs: some Dynamics AX code snippets (simple select statement example, difference between the while and while select, how to pop up a new form through code, execute query with filter, create a dialog radiobutton, …)


Continue reading......

by Patrik Luca 0 comments

31 May 2009

Links List May 2009

I decided to share all my interesting reads and resources month by month with my blog readers. You can find these posts by searching on the label Links. I'll try to order the resources in logical categories. If you would like to see some interesting stuff added in the next month, don't hesitate to post a comment.

So this is my Links post for May 2009.

SharePoint – General


SharePoint – Development and Programming


SharePoint – Business Data Catalog


Continue reading......

by Patrik Luca 0 comments

14 May 2009

Integration MOSS 2007 – Dynamics AX with BDC through a custom field type (part 1)

Introduction

In this series of post, I’ll show how you can integrate Microsoft Office SharePoint Server 2007 with another line of business system, more specifically Dynamics AX.

The purpose is to create a custom field type, which can be added as a column to a SharePoint list. This SharePoint column renders a dropdown box with values from a Microsoft SQL Server table’s column. As such, in stead of duplicating the possible values on your SharePoint box each time new values are added in your line of business system, the available values for this SharePoint column are always in synch with your line of business system.

This first post describes how to create your connection between Microsoft Office SharePoint Server 2007 and Dynamics AX.

In a following post, I’ll describe how to create the custom field type.

In a third post, I'll describe how to fill the dropdown list dynamically for the custom field based on the url.

Create a Business Data Catalog application definition file

To be able to communicate with the Dynamics AX database, you need to create a Business Data Catalog Application Definition File, which defines the entities and associations used by the Business Data Catalog (more information: see Business Data Catalog Application Definition File).

The Microsoft Business Data Catalog Definition Editor helps you to author application definition files for the Business Data Catalog. For more information, see Install the Business Data Catalog Definition Editor Tool and Creating a Database Connection by Using the Business Data Catalog Definition Editor.

I want my dropdown SharePoint custom field type get its values from the PROJACTIVITY table in Microsoft Dynamics AX. The next steps describe how to make the link to this table in BDC.

  1. Add LOB system database connection and enter the following text for Connection String:
    Server=<DATABASE_SERVER_NAME>\<INSTANCE_NAME>
    ;Database=<DAXDatabase>;Integrated Security=SSPI;

    Replace <DATABASE_SERVER_NAME>\<INSTANCE_NAME> with the name of your database server and <DAXDatabase> with the name of the database used by Microsoft Dynamics AX.

  2. Drag and drop the PROJACTIVITY table to the left.

  3. Set the AuthenticationMode to RevertToSelf for your Instance.


  4. Add a new Method: we will use this method to retrieve all Activities of a given Project. I’ll call this method in this example FindByProjId_<>.


  5. Give the Method a Name and a DefaultDisplayName. Enter the RdbCommandText to retrieve all fields from the PROJACTIVITY table for a given Project.


  6. Create a new Parameter for this newly created Method of type Direction In and enter @PROJID as Name and DefaultDisplayName.


  7. Add a second Parameter of type Direction In: @DATAAREAID.

  8. Add a third Parameter of type Direction Return and enter a Name and DefaultDisplayName.


  9. Create Root TypeDescriptor for both added Parameters and Add TypeDescriptors for your Return Parameter (you can copy-paste most of the properties from one of the other Methods).

  10. Add a Method Instance of type Finder.  Enter a Name and DefaultDisplayName.


  11. Enter a value for the Title property on the Entity. This column will be used to display the action menu.


  12. Enter a LOB System Name.

  13. Your tree of your application definition file should look like this by now:


  14. Export your application definition file.

  15. Go to your Shared Service Provider in SharePoint Central Administration. Choose Import application definition in the Business Data Catalog section and import your exported file.

Test your Business Data Catalog application definition file


  1. Go to your Shared Service Provider and choose View entities in the Business Data Catalog section.

  2. Choose your created Entity.

  3. In the Actions section, you’ll find a View Profile line with a url next to it: copy this url in your clipboard.

  4. Paste the url from your clipboard in Internet Explorer and replace the parameter values ({0}, {1}, ..) with actual values from your Dynamics AX table and hit the Enter key: you should see the detail of your Dynamics AX record in your browser now if everything works.

Remarks


  • The system account of your SharePoint application pool user might need read access to your Dynamics AX database.


Continue reading......

by Patrik Luca 0 comments

Patrik Luca, Ieper, BELGIUM
Feel free to use or spread all of the content on my blog. In return, linking back to my blog would be greatly appreciated. All my posts and articles are provided "AS IS" with no warranties.

Subscribe feeds via e-mail
Subscribe in your preferred RSS reader

Subscribe feeds rss Most Read Entries

Categories

Recommended Books


Subscribe feeds rss Recent Comments

This Blog is part of the U Comment I Follow movement in blogosphere. Means the comment field of this blog is made DOFOLLOW. Spam wont be tolerated.

Blog Archive

My Blog List

Followers

Links