Introduction
In this series of post, I’ll show how you can integrate Microsoft Office SharePoint Server 2007 with another line of business system, more specifically Dynamics AX.
The purpose is to create a custom field type, which can be added as a column to a SharePoint list. This SharePoint column renders a dropdown box with values from a Microsoft SQL Server table’s column. As such, in stead of duplicating the possible values on your SharePoint box each time new values are added in your line of business system, the available values for this SharePoint column are always in synch with your line of business system.
This first post describes how to create your connection between Microsoft Office SharePoint Server 2007 and Dynamics AX.
In this post, I’ll describe how to create the custom field type.
In a following post, I’ll describe how to make this custom field type more generic by using a dynamic where clause in the query.
Preparation
- In Visual Studio, select External Tools from the Tools menu.
- In the External Tools dialog, click Add and enter Get Assembly Public Key for the Title.
- Fill the Command textbox by browsing to C:\Program Files\Microsoft Visual Studio 8\SDK\v2.0\Bin\sn.exe.
- In the Arguments textbox, type the following (case sensitive) –Tp $(TargetPath).
- Enable the Use Output window checkbox.
- Click OK. The new command is added to the Tools menu.
See also: Prepare for Development of Custom Field Rendering Controls.
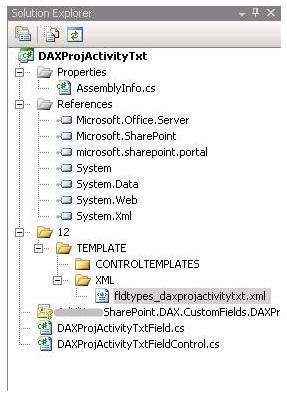
Create a Visual Studio project
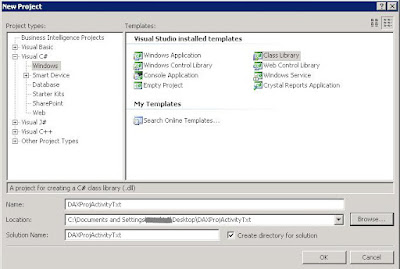
- Create a Class Library project with Microsoft Visual Studio 2005.
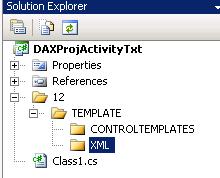
- Create a folder structure in your project.
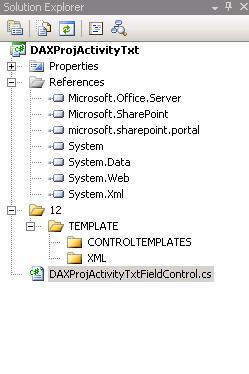
- Add a reference to the System.Web dll (add it by selecting it in the .NET tab page) and the dlls: Microsoft.Office.Server, Microsoft.SharePoint and microsoft.sharepoint.portal (add them by browsing to C:\Program Files\Common Files\Microsoft Shared\web server extensions\12\ISAPI to find it).
- Right-click the project name in Solution Explorer and select Properties.
- On the Application tab of the Properties dialog, enter MyCompany.SharePoint.DAX.CustomFields as the Default namespace and MyCompany.SharePoint.DAX.CustomFields.DAXProjActivityTxt as the Assembly name.
- Open the Signing tab and the select Sign the assembly.
- Choose <New…> from the Choose a strong name key file drop-down list box.
- In the Create Strong Name Key dialog, type MyCompany.SharePoint.DAX.CustomFields.DAXProjActivityTxt in the Key file name box, and then be sure that the Protect … check box is not checked. Click OK.
- Open the Build Events tab and type the following in the Post-build event command line box.
cd "$(ProjectDir)"
"%programfiles%\microsoft visual studio 8\sdk\
    v2.0\bin\gacutil" /i "$(TargetPath)" /nologo /f
%systemroot%\system32\iisapp.vbs /a
    "SharePoint_App_Pool" /r
xcopy *.ascx
    "C:\Program Files\Common Files\Microsoft Shared\
     web server extensions\12\TEMPLATE\CONTROLTEMPLATES\"
    /y
xcopy 12\Template\xml\fldtypes*.xml
    "C:\Program Files\Common Files\Microsoft Shared\
     web server extensions\12\TEMPLATE\XML\" /y
- SharePoint_App_Pool with the actual name of the Internet Information Server (IIS) Application Pool that is assigned to your Windows SharePoint Services Web Application.
See also: To set up the custom field project.
Create the Field Rendering Control
- Create the Field Rendering Control, to render your custom field in New mode or Edit mode (see Field Rendering Controls). Rename the Class1.cs file to DAXProjActivityTxtFieldControl.cs.
- Edit the DAXProjActivityTxtFieldControl.cs and change the namespace to MyCompany.SharePoint.DAX.CustomFields.
- Add the necessary using statements:
using System.Web.UI;
using System.Web.UI.WebControls;
using System.Web.UI.HtmlControls;
using Microsoft.SharePoint.WebControls;
using Microsoft.Office.Server.ApplicationRegistry.MetadataModel;
using Microsoft.Office.Server.ApplicationRegistry.SystemSpecific.Db;
- Replace the Class declaration with the following code:
public class DAXProjActivityTxtFieldControl : TextField
{
}
- Add following code lines to define the controls:
private DropDownList DAXProjActivityTxtDropDownList;
private HtmlTable table;
- Add the following override of the CreateChildControls method.
protected override void CreateChildControls()
{
    base.CreateChildControls();
    this.table = new HtmlTable();
    HtmlTableRow row = new HtmlTableRow();
    table.Rows.Add(row);
    HtmlTableCell cell = null;
    DAXProjActivityTxtDropDownList
        = TemplateContainer.FindControl(
          "DAXProjActivityTxtDropDownList")
        as DropDownList;
    if (DAXProjActivityTxtDropDownList == null)
        throw new ArgumentException("Activity
        dropdown list not found.
        Please check if your control
        template is valid.");

    if (this.ControlMode == SPControlMode.Edit ||
        this.ControlMode == SPControlMode.New)
    {
       row = new HtmlTableRow();
       cell = new HtmlTableCell();
       this.DAXProjActivityTxtDropDownList =
           new DropDownList();
       DAXProjActivityTxtDropDownList.ToolTip =
           "Enter Activity";
       DAXProjActivityTxtDropDownList.Width = 255;
       PopulateDAXProjActivityTxts(Guid.Empty.ToString());
       string currentValue = (string)this.ItemFieldValue;

       if (currentValue != null &
           currentValue != string.Empty)
       {
           this.DAXProjActivityTxtDropDownList.SelectedValue
               = currentValue;
       }
       else if
          (this.DAXProjActivityTxtDropDownList.Items.Count
           > 0)
       {
           this.DAXProjActivityTxtDropDownList.SelectedValue
               = "";
       }

        cell.Controls.Add(this.DAXProjActivityTxtDropDownList);
        row.Cells.Add(cell);
        table.Rows.Add(row);

    }

    LiteralControl literalControl = new LiteralControl();
    cell = new HtmlTableCell();
    cell.ColSpan = 4;

    if (this.ControlMode == SPControlMode.Display)
    {
        literalControl.Text
            = "<p id='SPFieldChoice'
                style='visibility:visible;
                font-size:11; margin-bottom:-3;
                margin-top:-3'>"
            + this.ItemFieldValue + "</p>";
    }

    cell.Controls.Add(literalControl);
    row.Cells.Add(cell);
    table.Rows.Add(row);
    base.Controls.Add(table);
}
- Add the following code to update the underlying value of the field to the latest user-set value:
public override void UpdateFieldValueInItem()
{
    this.EnsureChildControls();

    try
    {
        this.Value =
            this.DAXProjActivityTxtDropDownList.SelectedValue;
        this.ItemFieldValue = this.Value;
    }
    catch
    {
        ;
    }
}
- Add a method which uses the Business Data Catalog object model to populate the dropdown list with activities:
private void PopulateDAXProjActivityTxts(string partName)
{
    //connect to the LobSystemInstance that represents
    //the DAX Activities business application in the BDC
    NamedLobSystemInstanceDictionary instances
        = ApplicationRegistry.GetLobSystemInstances();
    LobSystemInstance instance = instances["Your_Instance"];

    // Connect to the DAX Activity entity
    Entity entity
        = instance.GetEntities()
            ["[Your_DB].[dbo].[PROJACTIVITY]"];

    Method method
        = entity.GetMethods()
            ["FindByProjId_[Your_DB].[dbo].[PROJACTIVITY]"];

    MethodInstance methodinstance
        = method.GetMethodInstances()
            ["FindByProjId_[Your_DB].[dbo].
              [PROJACTIVITY]_Instance"];
    Object[] args
        = methodinstance.GetMethod().
          CreateDefaultParameterInstances(methodinstance);
    args[0] = “your projid”;
    args[1] = “your dataareaid”;
    DbEntityInstanceEnumerator daxprojactivitytxts
        = (DbEntityInstanceEnumerator)entity.Execute(
              methodinstance, instance, ref args);

    // loop through the activities
    // and populate the activities dropdown
    while (daxprojactivitytxts.MoveNext())
    {
        DbEntityInstance daxprojactivitytxt
            = (DbEntityInstance)daxprojactivitytxts.Current;
        DAXProjActivityTxtDropDownList.Items.Add(
            new ListItem(
            daxprojactivitytxt.GetFormatted("TXT").ToString()));
    }
    daxprojactivitytxts.Dispose();
}
- Add the following override of the Render method.
protected override void Render(HtmlTextWriter output)
{
    this.table.RenderControl(output);
}
Create the Custom Field Class
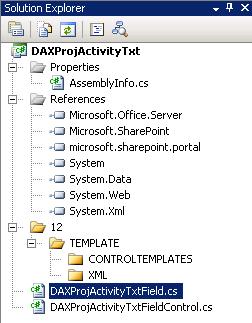
- Add a new class to the root of the project called DAXProjActivityTxtField.cs.
- Edit the DAXProjActivityTxtField.cs and change the namespace to MyCompany.SharePoint.DAX.CustomFields.
- Add the necessary using statements:
using Microsoft.SharePoint;
using Microsoft.SharePoint.WebControls;
- Let the class derive from SPFieldText.
public class DAXProjActivityTxtField :
    Microsoft.SharePoint.SPFieldText
- Implement two required constructors:
public DAXProjActivityTxtField(
    SPFieldCollection fields, string fieldName)
    : base(fields, fieldName)
{
}

public DAXProjActivityTxtField(
    SPFieldCollection fields, string typeName,
    string displayName)
    : base(fields, typeName, displayName)
{
}
- Override the FieldRenderingControl as follows:
public override BaseFieldControl FieldRenderingControl
{
    get
    {
        BaseFieldControl control =
            new DAXProjActivityTxtFieldControl();
        control.FieldName = this.InternalName;
        return control;
    }
}
Create the Field Type definition
- Add a new XML File in the folder XML of your project folder structure, called fldtypes_daxprojactivitytxt.xml.
- Edit the file by entering following lines:
<?xml version="1.0" encoding="utf-8" ?>
<fieldtypes>
    <fieldtype>
        <field name="TypeName">DAXProjActivityTxt</field>
  <field name="ParentType">Text</field>
  <field name="TypeDisplayName">DAX ProjActivityTxt</field>
  <field name="TypeShortDescription">DAX project activity cust fld.</field>
  <field name="UserCreatable">TRUE</field>
  <field name="FieldTypeClass">
            MyCompany.SharePoint.DAX.CustomFields.DAXProjActivityTxtField,
            MyCompany.SharePoint.DAX.CustomFields.DAXProjActivityTxt,
            Version=1.0.0.0, Culture=neutral, PublicKeyToken=cf2f0bd24cc4b888</field>
    </fieldtype>
</fieldtypes>
- Replace MyCompany with the same value as done in the replacement of the namespaces. Replace the value for the PublicKeyToken with the value you receive by executing the previously created External Tool in Visual Studio (Tools > Get Assembly Public Key)
Build the Visual Studio project
Build your Visual Studio project: the post-build events added previously will install everything needed to your SharePoint environment.
Add column to list
Add a SharePoint column to one of your SharePoint lists or create a site column: you’ll have a new type of information option. Choose it for the column you are creating.

Set Permission
You need to give the appropriate permissions to the SharePoint users who need to be able to edit the values in this column. Open SharePoint Central Administration, go to your Shared Service Provider and choose View applications in the Business Data Catalog section. Select your previously created Application and choose Manage Permissions. Give the SharePoint users Execute Right on the Application.
Result
When you create or edit an item in the list, your drop down column will be loaded with values from your Microsoft Dynamics AX source and should look like below:

Interesting resources
Continue reading......


