My 2p about ERP Solutions, Information Worker Solutions and other software products (mainly Microsoft Dynamics AX and Microsoft SharePoint).

06 September 2012

Change dynamically the sorting or grouping in a Report

Business requirement

My user wanted to be able to run a report for which the data could be dynamically grouped and sorted depending on some choice the user made upon starting up the report. According to the choice made, some other Sections should appear in between the grouped report data blocks.

Solution

Create a new BaseEnum, let’s call it ProjCust, with the different sorting and/or grouping possibilities, for example one to group by ProjId and one to group by CustAccount.

Create the report Class.

Define in the classDeclaration a DialogField and variable to handle the different sorting/grouping possibilities for the report.

public class TutorialGroupReport_GroupReport 
extends RunBaseReport
{
    DialogField             dialogReportBy;

    ADUProjCustDlvDate      reportBy;    
#localmacro.CurrentList

        reportBy

    #endmacro
}

In the dialog method, the possibilities to sort/group the report data is shown.


public Object dialog()

{

    DialogRunbase dialog = super();

    ;

    dialog.addGroup("@SYS1046");


    dialogReportBy  =
dialog.addFieldValue(TypeId(ProjCust),
reportBy,
"@SYS55014");


    return dialog;

}


In the getFromDialog method, store the sorting/grouping option chosen by the end user


public boolean getFromDialog()  
{

    ;

    reportBy    = dialogReportBy.value();

     return super ();
}

Create a method to return the option chosen by the end user.


ProjCust reportBy()  
{
    return reportBy;
}


Create an updateQuery method, which will adapt dynamically the report Query based on the option chosen by the end user


public Query updateQuery()  
{

    Query                   query;
    QueryBuildDataSource    queryBuildDataSource;

    QueryBuildRange         queryBuildRange;
    ;

    query = queryRun.query();

    queryBuildDataSource =
query.dataSourceTable(tableNum(ProjTable));

     switch (this.reportBy())
    {

        case ProjCust::ProjId:
            queryBuildDataSource.addSortField(
fieldNum(ProjTable,ProjId));

            break;
        case ProjCust::CustAccount:

            queryBuildDataSource.addSortField(
fieldNum(ProjTable,CustAccount));
            queryBuildDataSource.addSortField(
fieldNum(ProjTable,ProjId));

            break;
        default:    // In default, error.

            throw error(strFmt("@SYS27147",
this.toString()));
    }

    return query;
}

Call the updateQuery method in the run method.


void run()  
{

    ;

    this.updateQuery();

     super();
}

Add the other appropriate methods to the class, such as a lastValueElementName, pack, unpack, description and main method.


Create the Report and the Design of it.


Add your report Class and the report DataSource to be grouped/sorted dynamically as variable the classDeclaration

public class ReportRun extends ObjectRun  
{

    TutorialGroupReport_GroupReport tutorial_GroupReport;
    ProjTable                       projTable;

}

Assign the caller to the report Class variable in the init method.

public void init()   
{

    super();

     tutorial_GroupReport = element.args().caller();

}


In the fetch method you can change the sorting/grouping dynamically based on the choice of the end user and if necessary add additional design stuff.

public boolean fetch() 

{
    QueryRun        queryRunProjTable;

    ProjId          parentProjId;
    CustAccount     custAccount;

    ;

    queryRunProjTable = new QueryRun(
tutorial_GroupReport.updateQuery());

    this.queryRun(queryRunProjTable);

    while (queryRunProjTable.next())

    {
        projTable = queryRunProjTable.get(
tableNum(ProjTable));


        switch (tutorial_GroupReport.reportBy())
        {

            case ProjCust::ProjId:
                if (projTable.ParentId != parentProjId)

                    this.execute(1);
                    parentProjId = projTable.ParentId;

                break;
            case ProjCust::CustAccount:

                if (projTable.CustAccount != custAccount)
                    this.execute(2);

                    custAccount = projTable.CustAccount;
                break;

            default:    // In default, error.
                throw error(strFmt("@SYS27147",
this.toString()));
        }


        this.send(projTable);
    }

    return true;
}


Continue reading......

by Patrik Luca 0 comments

28 August 2012

Enable trade agreement evaluation on new SalesLine fields

Business requirement: show overwrite prices and discounts dialog for new SalesLine field

If you add a new field to the SalesLine or SalesQuotationLine table, and this field is important for trade agreement evaluations, you should add some code for this field, to enable the Trade Agreement Evaluation functionality. Else, the dialog asking to Overwrite Prices And Discounts won’t appear upon changing this new field.

Solution

Add the new field to the Map PriceDiscResultFields and configure the necessary Mappings with the SalesLine and or SalesQuotationLine table.

In method isTriggerFieldChanged from Map PriceDiscResultFields, add following code for your new field:

…
boolean lineFieldChanged()
{
    return _priceDiscResultFields.SalesPurchQty        
!= priceDiscResultFieldsOrig.SalesPurchQty
|| _priceDiscResultFields.SalesPurchUnit     
!= priceDiscResultFieldsOrig.SalesPurchUnit
|| _priceDiscResultFields.CurrencyCode       
!= priceDiscResultFieldsOrig.CurrencyCode

          || _priceDiscResultFields.RecieptDeliveryDate
!= priceDiscResultFieldsOrig.RecieptDeliveryDate
          || _priceDiscResultFields.Price
!= priceDiscResultFieldsOrig.Price
          // BEGIN
|| _priceDiscResultFields.YourNewField
!= priceDiscResultFieldsOrig.YourNewField;
// END
}


In Class SalesLineType, method validateField, add following code:


// BEGIN

case fieldNum(SalesLine, YourNewField):

    ok = salesLine.runPriceDiscPolicyDialog();

    break;

// END


Continue reading......

by Patrik Luca 0 comments

29 February 2012

Links List February 2012

I decided to share all my interesting reads and resources month by month with my blog readers. You can find these posts by searching on the label Links. I'll try to order the resources in logical categories. If you would like to see some interesting stuff added in the next month, don't hesitate to post a comment.

So this is my Links post for February 2012.

Dynamics AX

Freeware

  • MP3GAIN: MP3Gain analyzes and adjusts mp3 files so that they have the same volume.


Continue reading......

by Patrik Luca 0 comments

17 January 2012

Where is the Quantity tab on the Sales order form in AX 2012?

Problem description

You may be searching for the Quantity tab on the Sales order form in Dynamics AX 2012 where you can find stuff like the Quantity Delivered, Invoiced, … for each sales line of the sales order, and not able to find it. It has been moved a bit in the AX 2012 release.

Solution

You can find it by selecting the General tab in the ribbon and choose Line quantity: a new form will open, having similar information with the previous AX versions.


Continue reading......

by Patrik Luca 1 comments

16 January 2012

Dynamics AX 2012 Office Add-ins

Introduction

In this post, I explain the different steps to generate a document using a Word template and the Office Add-ins for Dynamics AX 2012.

Publish data sources

You need the define which data sources from Dynamics AX, users are allowed to use in Office.

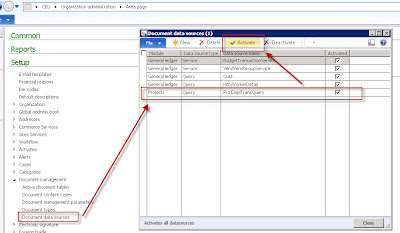
  1. Go to Organization administration > Setup > Document management > Document data sources.
  2. Add the data source you want to use.
  3. Activate the data source by using the Activate button.

Connecting to the AOS

Next, you need to define where to fetch the data from in Word, it is from which AOS. If there are multiple AOS instances, like for example a test, development, … environment, follow these steps:

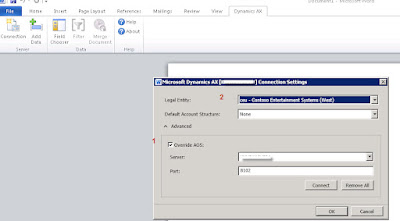
  1. Open Word, go to the Dynamics AX tab and click the Connection button. Open the Advanced section and fill out the Server and Port.
  2. Choose the Legal Entity from which data should be retrieved.

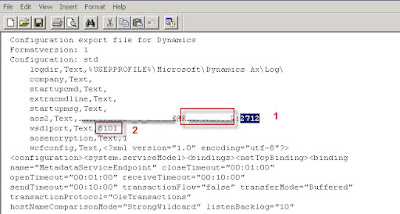
If you don’t know the Server and  Port name, just find the configuration file you are using to start up Dynamics AX. Open it with Notepad and look for following information:

Remark 1= after the @ sign, you can find the AOS instance name. Remark 2 = the Port, so don’t fill out the Port you find after the : sign on the aos2 lign.

Design the Word document

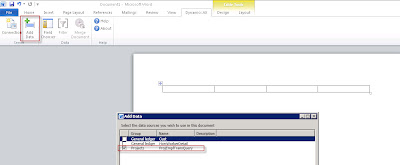
In this example I’ll add a table to my Word document for repeating values of my ProjEmplTransQuery data source, to show hour transactions for a Project.

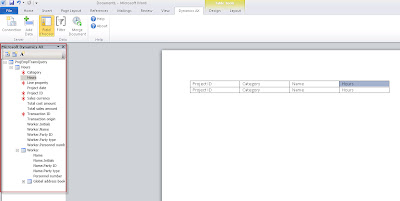
Next, go to the Dynamics AX tab and choose Add Data. Select the ProjEmplTransQuery data source and hit OK.

To the right, you’ll notice the fields of the chosen data source. As you can notice, if you add related tables to your data source, you can pick fields from multiple tables. Drag and drop the fields you want in your report in the columns of the Word table. If you drop them in the second row, automatically a header row will be created.

You can add whatever Word formatting style you like to your table, to make it look nice.

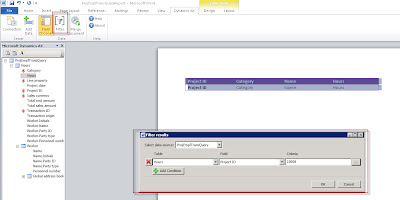
Maybe it would be great to add a filter to the retrieved data, for example only for a specific project number:

  1. Go to the Dynamics AX tab.
  2. Choose Filter.
  3. Add the appropriate filters.

Next, save the Word document.

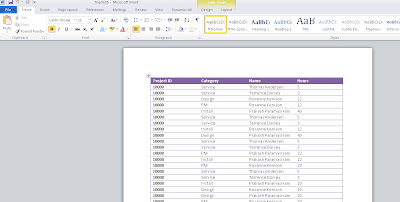
Generating the report

  1. Open the saved Word document.
  2. Go to the Dynamics AX tab.
  3. Choose Merge Document.

Adding additional data

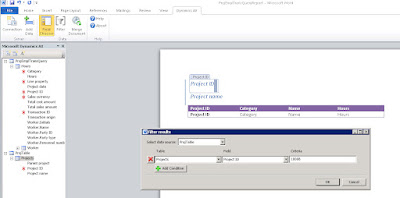
Another data source could be connected to the same Word document. In my example below, I’ve added the ProjTable data source. I use this data source to put some fields on my report, so no repeating table. To make sure, the fields are filtered the same way my rows in my table are (for the same project), I should add the same filter to my second data source:

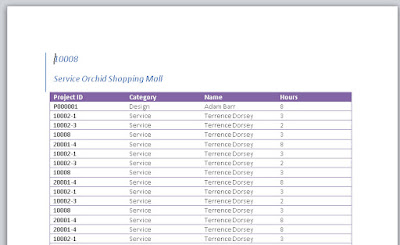
Rerun the report:

A remark: apparently, fields added a such to the Header or Footer of a Word document aren’t replaced by the Merge action. Just a pity, but apparently it ain’t working…

Add the Word template to Dynamics AX

  1. Remove the Filter from the Word document and save it.
  2. Upload your Word document to a SharePoint library.
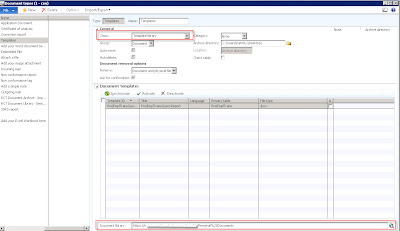
  3. Go to Organization administration > Setup > Document management > Document types. Create a new Type and choose as Class Template library. Fill out the url of the SharePoint library to which you’ve uploaded the Word template in the field Document library. Activate it.

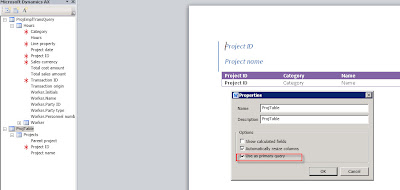
Once activated, each form containing a reference to the Primary table, will be able to generate the document. This is a problem as our Primary table currently is the ProjEmplTrans table. However, the ProjTable was included in our document aswell, so I would like to make this the Primary table. To do so, open the Word document, right click the ProjTable node, choose Properties and check the Use as primary query checkbox.

Remove the ProjEmplTransQuery anyway: it won’t filter on Project-Id as it ain’t the primary query.

Re-upload your Word document to the SharePoint library and Synchronize the Document Type in AX with the library. Now the Primary table is ProjTable for this Word document.

Add the generate from template buttons

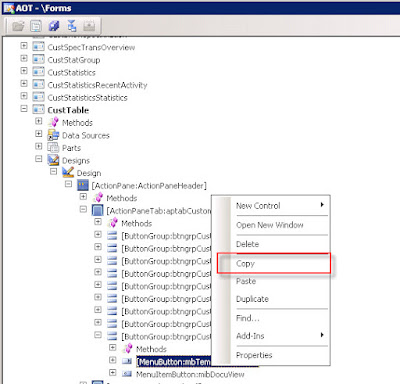
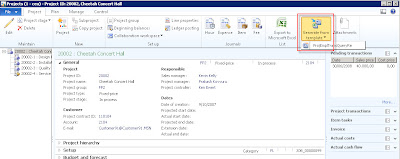
To be able to generate the document, some buttons should be added. The CustTable form has already the necessary buttons, so it is easiest to just copy it from there and paste it to your target form, in this example the ProjTable form:

Some methods should be added on your target form, being classDeclaration:

// classDeclaration 
class FormRun extends ObjectRun
{
    …
    // BGN Office Add-ins

    boolean isDocuActionTemplate;
    // END Office Add-ins
}

The init method:


void init()  
{
    …
    super()
    // BGN Office Add-ins
    isDocuActionTemplate =
DocuActionForTemplate::createTemplateOnMenuButton(
mbTemplatesButton, projTable.TableId);
    …
// END Office Add-ins

}

The run method:

public void run()
{
…
docuActionTemplateUndefined.visible(
!isDocuActionTemplate);
}


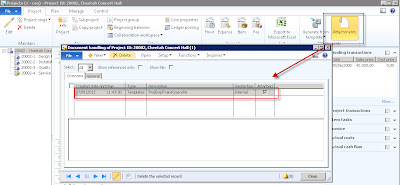
Now we can generate the document with as Filter the Project Id from the record selected in the Form. The document is generated and automatically attached to the record in the form:


Continue reading......

by Patrik Luca 14 comments

13 January 2012

Intercompany timesheets

Finally, entering  hours on a project in another legal entity will become possible in Dynamics AX 2012, according to a Technet article.

I haven’t tried it yet, but it sounds great:

The intercompany timesheet feature in Microsoft Dynamics AX makes it possible for a worker who is employed by one legal entity to enter timesheet hours for work performed on projects in a different legal entity, without having to be employed by the legal entity that is managing the project.

The legal entity that employs the worker is called the loaning legal entity. The legal entity that manages the project for which the worker contributes hours is called the borrowing legal entity.

In addition to a cost price, which the loaning legal entity incurs by using the worker, and the sales price, which the customer pays the borrowing legal entity, the intercompany timesheet feature includes a transfer price, which is the amount that the borrowing legal entity pays to the loaning legal entity for the use of its worker.


Continue reading......

by Patrik Luca 3 comments

09 January 2012

About registering item consumption on projects

There is a nice Technet article, describing the different ways of consuming item in the Project management and accounting module. I would like to extend it a bit further with this post, elaborating further the differences between all those ways.

Method 1: Project sales order


  • Item transactions are consumed when the customer project invoice is posted.
  • Always billable to the customer, no possibility to set it to non chargeable.
  • Possibility of partial deliveries.
  • Only possible for time and material projects.
  • Missellaneous charges functionality available.
  • Discount functionality with trade agreements available.
  • Planned issue, so net requirements will decrease upon posting the consumption.

Method 2: Inventory journal


  • Item transactions are consumed when the journal is posted.
  • Possible to set it as non chargeable, hence not invoicing it to the customer.
  • Partial deliveries not possible.
  • Possible for all project types.
  • Missellaneous charges functionality not available.
  • Discount functionality with trade agreements not available.
  • Unplanned issue, so net requirements will not decrease upon posting the consumption.

Method 3: Project item requirement


  • Item transactions are consumed when the packing slip is updated.
  • Possible to set it as non chargeable, hence not invoicing it to the customer.
  • Possibility of partial deliveries.
  • Possible for fixed-price and time and material projects.
  • Missellaneous charges functionality not available.
  • Discount functionality with trade agreements not available.
  • Planned issue, so net requirements will decrease upon posting the consumption.

Method 4: Purchase order


  • Item transactions are consumed on a packing slip update or when the customer or vendor is invoiced. It depends how the purchase order was created: see my post Purchase orders in project management.
  • Possible to set it as non chargeable, hence not invoicing it to the customer.
  • Possibility of partial deliveries.
  • Possible for all project types.
  • Missellaneous charges functionality available.
  • Discount functionality with trade agreements available.


Continue reading......

by Patrik Luca 0 comments

Patrik Luca, Ieper, BELGIUM
Feel free to use or spread all of the content on my blog. In return, linking back to my blog would be greatly appreciated. All my posts and articles are provided "AS IS" with no warranties.

Subscribe feeds via e-mail
Subscribe in your preferred RSS reader

Subscribe feeds rss Most Read Entries

Categories

Recommended Books


Subscribe feeds rss Recent Comments

This Blog is part of the U Comment I Follow movement in blogosphere. Means the comment field of this blog is made DOFOLLOW. Spam wont be tolerated.

Blog Archive

My Blog List

Followers

Links