My 2p about ERP Solutions, Information Worker Solutions and other software products (mainly Microsoft Dynamics AX and Microsoft SharePoint).

30 September 2009

Links List September 2009

I decided to share all my interesting reads and resources month by month with my blog readers. You can find these posts by searching on the label Links. I'll try to order the resources in logical categories. If you would like to see some interesting stuff added in the next month, don't hesitate to post a comment.

So this is my Links post for September 2009.

SharePoint – General

SharePoint - Design and Customization

Dynamics AX

Freeware


Continue reading......

by Patrik Luca 0 comments

15 September 2009

Storing images with Dynamics AX

Business Requirement: uploading image files for re-use

You want to implement functionality in Dynamics AX to store images (.jpg, .bmp, … files) which can be re-used for f.e. printing purposes on commercial documents such as the invoice or the packing slip. The end-user must be able to upload in an easy way such a file stored on his local disk, or to view and change the image.

Solution: re-use the Company logo code

Such functionality exists in standard Dynamics AX to store a Company logo for each Company Account (Basic>Setup>Company information>Company logo button). The great news is the code can be easily reused on whatever other form, since the table CompanyImage for storage of the images is generic as it contains the TableId and RecId of the record to which you link the image.

In the next example I’ll attach a logo to my CustTable records: so for each customer I would like to store a logo.

  1. Open the Application Object Tree (AOT) and browse to Menu Items>Display>CompanyImage.
  2. Open another AOT window and browse to your Customers form (Forms>CustTable).
  3. Open the Design>Design>ButtonGroup node of the CustTable form.
  4. Drag the CompanyImage menu item in the ButtonGroup.
  5. Right-click the just added MenuItemButton and choose Properties. Add Customer Logo as Text property.
  6. Save your changes.

When you open the Customers form now, a new button will be available Customer Logo. Click on it and you’ll be able to attach an image file to the active customer record. No further coding needed for storing, changing, viewing the image!

Your records will be saved in the CompanyImage table with as RefTableId the TableId (77) of the CustTable and the RefRecId of the Customer record selected upon attaching the image file.

To use these images in f.e. a report, add a Bitmap control to the report Design.

Add a display method for this added Bitmap control which looks for example as underneath (I work further on the example where I added images to my CustTable records). In my example I suppose there is a datasource for CustInvoiceJour.

display Bitmap  showCustomerLogo()

{

    CustTable       custTable = CustTable::find(
custInvoiceJour.InvoiceAccount);

    ;

    return CompanyImage::find(custTable.dataAreaId,
custTable.TableId, custTable.RecId).Image;

}


Continue reading......

by Patrik Luca 8 comments

10 September 2009

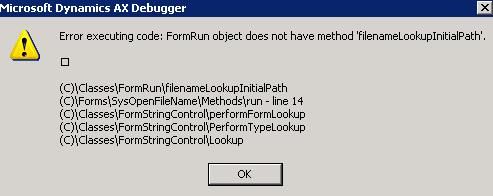
Stack Trace after adding FileNameOpen EDT to a form

Problem Description: stack trace after adding FileNmeOpen Extended Data Type to a form

After having added a StringEdit control to a Dynamics AX form with as ExtendedDataType FileNameOpen, you get a stack trace upon clicking the open icon: Error executing code: FormRun object does not have method ‘filenameLookupInitialPath’.

The same could happen if you add one with as ExtendedDataType FilePath.

Solution: add some form methods

To fix this, you should add some methods to your form.

str fileNameLookupFilename()

{

    return '';

}


str fileNameLookupTitle()

{

    return "@SYS53008";

}


str fileNameLookupInitialPath()

{

    return '';

}

container fileNameLookupFilter()

{

    return ['All files','*.*'];

}

An example can be found on form CompanyImage.

You could replace the fileNameLookupFilter to show only files of a certain type, for example only *.txt files. An example could be in this case:

container fileNameLookupFilter() 

{

    return ['All *.txt files','*.txt'];

}


Continue reading......

by Patrik Luca 0 comments

03 September 2009

Integration MOSS 2007 – Dynamics AX with BDC through a custom field type (part 3)

Introduction

In this series of post, I’ll show how you can integrate Microsoft Office SharePoint Server 2007 with another line of business system, more specifically Dynamics AX.

The purpose is to create a custom field type, which can be added as a column to a SharePoint list. This SharePoint column renders a dropdown box with values from a Microsoft SQL Server table’s column. As such, in stead of duplicating the possible values on your SharePoint box each time new values are added in your line of business system, the available values for this SharePoint column are always in synch with your line of business system.

This first post describes how to create your connection between Microsoft Office SharePoint Server 2007 and Dynamics AX.

The second post describes how to create the custom field type.

Currently however, the DAX project activities we are receiving in our dropdown list are based on a specific project.

In this post, I’ll describe how to receive those project activities for a project depending on the site the issue list is part of.

Preparation

Suppose you have created a Subsite for all your projects (called Projects) under the top level Web Site. For each project, you’ve created a specific Subsite under the Projects Subsite.

What we’ll need first, is that we can link this Subsite to a Dynamics AX ProjId. To achieve this, set the URL name of eacht Project Subsite to <ProjId>_<dataAreaId>. So the url should look like http://<webapplication>/projects/<ProjId>_<dataAreaId>.

Adapt the Field Rendering Control

In the Field Rendering Control DAXProjActivityTxtFieldControl.cs we’ve created a method PopulateDAXProjActivityTxts. In this method, we used two arguments, being the ProjId and the dataAreaId, which we gave a hardcoded value. We are going to make this values depending on our url.

  1. First of all we need to add an additional using statement to be able to use the SPWeb Class.:
    using Microsoft.SharePoint;


  2. In the method PopulateDAXProjActivityTxts, look for the lines where we set a value for the arguments passed to our SQL query (args[0] = …). Replace those lines with the following code:


    //return the Web site of the current request
    SPWeb web = SPContext.Current.Web;
    // url of the Web site
    string path = web.Url;
    Uri uri = new Uri(path);
    // get part of url where ProjId and dataAreaId are stored
    string proj = uri.Segments.GetValue(2).ToString();
    char[] splitter = { '_' };
    string[] splittedproj = proj.Split(splitter);
    // ProjId
    args[0] = splittedproj[0];
    // dataAreaId
    args[1] = splittedproj[1];


  3. Build your Visual Studio project: the post-build events added previously will install everything needed to your SharePoint environment.


Result


When you create or edit an item in the list, your drop down column will be loaded with values from your Microsoft Dynamics AX source: but now those values will be variable: they’ll depend upon the part of your url where you created the link with your ProjId and dataAreaId.


Continue reading......

by Patrik Luca 0 comments

Patrik Luca, Ieper, BELGIUM
Feel free to use or spread all of the content on my blog. In return, linking back to my blog would be greatly appreciated. All my posts and articles are provided "AS IS" with no warranties.

Subscribe feeds via e-mail
Subscribe in your preferred RSS reader

Subscribe feeds rss Most Read Entries

Categories

Recommended Books


Subscribe feeds rss Recent Comments

This Blog is part of the U Comment I Follow movement in blogosphere. Means the comment field of this blog is made DOFOLLOW. Spam wont be tolerated.

Blog Archive

My Blog List

Followers

Links