Problem description: Getting framework with id ‘012345’ failed from Lifecycle Services While trying to open a Task recording from Lifecycle Services you receive this error suddenly, while you were able to open Task recordings on your environment before Solution - Log in on the AOS of your environment
- Open Microsoft SQL Server Management Studio
- Execute following queries on the AxDB database:
delete SYSOAUTHCONFIGURATION where SECURERESOURCE = 'https://lcsapi.lcs.dynamics.com'
delete SYSOAUTHUSERTOKENS where SECURERESOURCE = 'https://lcsapi.lcs.dynamics.com'
select * from sysoauthusertokens
select * from SYSOAUTHCONFIGURATION
delete SYSHELPSETUP
delete SysLCSLibrary
delete SysLCSProject
delete SysHelpCPSSetup - Go to Dynamics 365 FO and go to Help (?) > Support
- Click the ‘Click here to connect to Lifecycle Services’ link in the Connect to Lifecycle Services prompt. This will refresh the OAuth token for LCS.
- Go to System Administration > Setup > System Parameters. In the Help tab, under Task Guide and Support contact, select the correct LCS project.
Continue reading......
by Patrik Luca
Delicious
0
Problem description: modifying Security in application workspace not possible if version control is enabled
In case version control is enabled, it is not possible anymore to create new Security roles, new Duties, copy Duties, delete Duties through the Dynamics AX application workspace. You always have to open a development workspace and have access to the AOT. Solution: disable check on version control Modify following objects in the AOT to enable modifying Security in the application workspace with version control enabled. Class SysSecTree, method canDoStuff:
…
boolean        rootSelected, atLeastOneNodeSelected;

// BGN to allow user to create security duties through GUI in case version control is on
//if (SysSecHelper::isVersionControlOn() || !treeControl)
//{
//    return [false, false, false, false, false, false];
//}
if (!treeControl)
{
    return [false, false, false, false, false, false];
}
// END

idx = treeControl.getFirstSelected();
...
Form SysSecRolesEditTasks, method init:
...
    refreshSingleSecurityButton.visible(true);
}

// BGN
// to allow user to create security roles through GUI
// in case version control is on
//
//if (SysSecHelper::isVersionControlOn())
//{
//    this.enableReadOnlyMode();
//}
//else
//{
//    roleName.viewEditMode(ViewEditMode::Edit);
//    roleDescription.viewEditMode(ViewEditMode::Edit);
//}

roleName.viewEditMode(ViewEditMode::Edit);
roleDescription.viewEditMode(ViewEditMode::Edit);
// END

sysTreeControl = new SysSecTreeControl(this as Object);
...
Continue reading......
by Patrik Luca
Delicious
0
Problem description: Limited Main menu after activating Retail configuration key After activating a Retail configuration key, restarting Dynamics AX client only shows one menu item in the Main menu: Retail Essentials. Also some buttons aren’t available anymore on Sales orders and Purchase orders, such as Request change, Purchase order confirmations, … Solution: activate configuration key Full feature set Apparently activating Retail limits (to ease user experience) the Dynamics AX client. In case you want to use some Retail features, but you are not in a Retail implementation, checking the Full feature set configuration key brings back all the features of Dynamics AX in the Main menu. 
Continue reading......
by Patrik Luca
Delicious
0
Business requirement: Schedule full CIL compile
A full CIL compile can be run from the AX client, but you cannot schedule it. This post describes how to achieve scheduling a full CIL compile recurring using Task Scheduler. Solution: step-by-step scheduling with Task Scheduler Open Task Scheduler, create a new folder for your Dynamics AX tasks and choose Create new Task. 
In the Triggers tab define the recurrence pattern for your task. 
In the Actions tab define the task to run, being the full CIL compile.
In the Program/script field point to your AX client, normally it should be located in "C:\Program Files (x86)\Microsoft Dynamics AX\60\Client\Bin\Ax32.exe".
As arguments you specify the following:
-aos2=<AOSServer>:<portnumber> -startupcmd=CompileIl -lazytableloading –lazyclassloading where you replace <AOSServer> and <portnumber> with your actual AOS and port. 
You are done: CIL compile is scheduled to run recurrent, just make sure you have a remote desktop session open to the server where you have scheduled it, so it can kick off at the scheduled time.
Continue reading......
by Patrik Luca
Delicious
0
I decided to share all my interesting reads and resources month by month with my blog readers. You can find these posts by searching on the label Links. I'll try to order the resources in logical categories. If you would like to see some interesting stuff added in the next month, don't hesitate to post a comment. So this is my Links post for October 2013. Dynamics AX Project Accounting
Continue reading......
by Patrik Luca
Delicious
0
Introduction
There is a really nice new feature from R2 onwards in the Project management and accounting module for project purchase orders. There is a new checkbox in the project accounting parameters, called Create item requirements. Functionality What it does is, when you create a project purchase order, it creates automatically for you a marked item requirement on the project purchase order (and not anymore the annoying virtual inventory transaction which makes upon receipt of the project purchase order, items are consumed immediately on the project). Upon receipt of your project purchase order, the popup still comes where you can choose to consume the items immediately, but you don't need to do it. Making it possible to ship actually after receipt of your project purchase order, your goods on a latter moment in time and keep it in between in your warehouse (and probably break the marking and reservation so you can use the bought goods for another more urgent project).
Continue reading......
by Patrik Luca
Delicious
0
Introduction
Some changes to project item requirements are introduced since AX 2012 R2.
Changes in AX 2012 R2The Item requirements form moved from the Manage to the Plan tab in the ribbon.
You can create Sales orders of Order type Item requirements. As consequence, you can create as many Item requirements Sales orders as you want on the same project. Hence you could group your Item requirements based on Delivery date, and also if that group of item requirements changes of Delivery date, you can simply adapt it on the Sales order heading in stead of having to do it Order line by Order line.
Although you can create Sales orders of Order type Item requirements, you still can’t post the Packing Slip from the Project sales orders form: you still can only book it on the Item requirements form.
Continue reading......
by Patrik Luca
Delicious
0
I decided to share all my interesting reads and resources month by month with my blog readers. You can find these posts by searching on the label Links. I'll try to order the resources in logical categories. If you would like to see some interesting stuff added in the next month, don't hesitate to post a comment. So this is my Links post for March 2013. Dynamics AX Supply Chain Management
Continue reading......
by Patrik Luca
Delicious
0
Business requirement: add fields for intercompany synchronization If you need to synch additional sales line fields upon activation of the intercompany chain, some code modifications have to been executed. In this example the Customer Reference on the salesline needed to be synchronized.(field CustomerRef). End users had to be able to input a different customer reference line by line, not one general customer reference for the sales order as a whole. Solution: X++ modifications First of all the field CustomerRef should be set to visible on the salesline, so end users can modify it. The field is already available in the AOT on the SalesLine table, it is only not visible in the form. Next, modify the method interCompanyUpdateNow on the PurchLine table: add some code for the new field to be synchronized. ...
|| this.orig().ReturnDispositionCodeId
!= this.ReturnDispositionCodeId
|| this.orig().ReturnStatus
!= this.ReturnStatus
|| this.orig().MatchingAgreementLine
!= this.MatchingAgreementLine
// BEGIN
|| this.orig().CustomerRef
!= this.CustomerRef
// END
)
{
ok = true;
}
...
Add a new parm method to the class AxPurchLine for the new field to be synchronized.
public CustRefLine parmCustRefLine(CustRefLine
                             _custRefLine = '')
{
    if (!prmisDefault(_custRefLine))
    {
        this.setField(fieldNum(PurchLine, CustomerRef),
                                          _custRefLine);
    }

    return purchLine.CustomerRef;
}
Add a new parm method to the class AxSalesLine for the new field to be synchronized.
public CustRefLine parmCustRefLine(CustRefLine
                             _custRefLine = '')
{
    if (!prmisDefault(_custRefLine))
    {
        this.setField(fieldNum(SalesLine, CustomerRef),
                                          _custRefLine);
    }

    return salesLine.CustomerRef;
}
Modify the interCompanyMirror method of class PurchLineType so the new field gets synchronized upon creation of changing the purchline.
...
// BEGIN
if (create ||  purchLine.fieldChanged(fieldNum(PurchLine,
                                             CustomerRef)))
    axSalesLine.aduParmCustRefLine(purchLine.CustomerRef);
// END
...
Modify the syncPurchLine method of class SalesLineType so the new field gets synchronized upon creation of changing the salesline.
...
// BEGIN
if (create
||  _salesLine.fieldChanged(fieldNum(SalesLine,
                                   CustomerRef)))
    axPurchLine.aduParmCustRefLine(_salesLine.CustomerRef);
// END
...
Continue reading......
by Patrik Luca
Delicious
0
Problem description: Word file generation fails Upon generating a MS Word file from within Dynamics AX some cryptic error message is thrown like Method add in COM-object of class Documents returns error code 0x800A1436. Solution In MS Word go to Options > Trust Center > Trust Center Settings > Protected View and uncheck Enable Protected View for files originating from the Internet.
Continue reading......
by Patrik Luca
Delicious
0
Introduction
To set up a case e-mail template, first you create a template and then you open the e-mail editor to set up the predefined contents of e-mail messages that are based on the template. The predefined contents consist of merge data and links that can be inserted in the template. The merge data is a set of data that provides details on the case in the e-mail message. Merge-data overview The following merge-data elements can be added in the e-mail template. The merge-data elements can be used to inform the user about various aspects of the case. | HTML merge-data element | Information displayed in e-mail message | | %CaseId% | The identification number assigned to the case | | %CaseDescription% | A description of the case | | %CaseSourceName% | The name of the party record that the case is created for | | %CaseMemo% | Additional notes about the selected case | 
Link the e-mail template to the case category  Start sending mails from your Cases, some data of the case will be merged into the generated e-mail message. 
Continue reading......
by Patrik Luca
Delicious
0
Problem description When creating or modifying alert rules, the e-mail shows always the email
of the current user, in stead of the email of the user for whom the alert rule
is valid. This problem is fixed in Dynamics AX 2012. Solution Some X++ modifications are needed in two Forms. Form EventCreateRule, method modified on Field EventRule.UserId: public void modified()
{
super();
// BEGIN
eventRule_SendEmailAddress.text(
SysUserInfo::find(EventRule.UserId).Email);
// END
}
Form EventRule, method setControlsActive on DataSource EventRule:
...
else if (!canShowPopUpCheckBox)
{
  alertMeBy.visible(true);
  eventRule_ShowPopUp.visible(false);
  eventRule_SendEmail.visible(true);
  eventRule_SendEmailAddress.visible(true);
  // BEGIN
  //eventRule_SendEmailAddress.text(userInfo.Email);
  eventRule_SendEmailAddress.text(
    SysUserInfo::find(EventRule.UserId).Email);
  // END
}
else
{
  alertMeBy.visible(true);
  eventRule_ShowPopUp.visible(true);
  eventRule_SendEmail.visible(true);
  eventRule_SendEmailAddress.visible(true);
  // BEGIN
  //eventRule_SendEmailAddress.text(userInfo.Email);
  eventRule_SendEmailAddress.text(
    SysUserInfo::find(EventRule.UserId).Email);
  // END
}

if (eventRule.UserId == curuserid())
  eventInboxSingleton.enabled(true);
...
Continue reading......
by Patrik Luca
Delicious
0
Problem: find method not returning rows on a temporary table Temporary table variables are always newly created, so a static find table method should be written differently compared to regular tables. Solution To make your find method work, you need to pass through the reference to the temporary table. public static TmpAvgCubicMeterPrices find(
ProjId _projId,
InventDimCombinationName _inventDimCombinationName,
TmpAvgCubicMeterPrices _tmpAvgCubicMeterPrices,
boolean _forUpdate = false)
{
TmpAvgCubicMeterPrices tmpAvgCubicMeterPrices;
;
tmpAvgCubicMeterPrices.setTmpData(
_tmpAvgCubicMeterPrices);
tmpAvgCubicMeterPrices.selectForUpdate(_forUpdate);
select firstonly tmpAvgCubicMeterPrices
where tmpAvgCubicMeterPrices.ProjId
== _projId
&& tmpAvgCubicMeterPrices.InventDimCombinationName
== _inventDimCombinationName;
return tmpAvgCubicMeterPrices;
}
Continue reading......
by Patrik Luca
Delicious
0
Problem: unexpected changecompany
I was faced with a problem in Dynamics AX 2012, where sometimes an unexpected changecompany happened in a process. Sometimes it occurred, sometimes it didn’t, making it difficult to simulate it. Solution The cause of the problem was the SysOperationProgress class. This class can be used to inform the user about status, operation and progress of the system. It was initiated before my changecompany call and closed after it. When the progress bar created by the SysOperationProgress class was refreshed during code execution within my changecompany class, a call is done by X++ to the Docu class. This triggers also a changecompany due my original legal entity. Hence some of my code within my changecompany call was executed in the company to which I did the change, some was done in the company I originated from. And this not all of the time, as it only happened if a refresh happened of my progress bar within the changecompany call. I removed the SysOperationProgress and my problem was solved.
Continue reading......
by Patrik Luca
Delicious
0
Business requirement Some flow should execute some code in batch, so you need to add a batch job for the corresponding RunBaseBatch class. Solution
public static void scheduleBatch()
{
    BatchHeader           batchHeader;
    BatchInfo             localBatchInfo;
    YourRunBaseBatchClass yourRunBaseBatchClass;
    SysRecurrenceData     sysRecurrenceData =
             SysRecurrence::defaultRecurrence();
    ;

    yourRunBaseBatchClass =
        YourRunBaseBatchClass::construct();

    // retry 3 times
    sysRecurrenceData =
        SysRecurrence::setRecurrenceEndAfter(
                        sysRecurrenceData, 3);
    // retry after 1 minute
    sysRecurrenceData =
        SysRecurrence::setRecurrenceUnit(sysRecurrenceData,
                             SysRecurrenceUnit::Minute, 1);

    localBatchInfo = yourRunBaseBatchClass.batchinfo();
    localBatchInfo.parmGroupId("YourBatchGroupId");
    batchHeader = batchHeader::construct();
    batchHeader.addTask(yourRunBaseBatchClass);
    batchHeader.parmRecurrenceData(sysRecurrenceData);
    batchHeader.save();
}
Continue reading......
by Patrik Luca
Delicious
0
Business requirement
My user wanted to be able to run a report for which the data could be dynamically grouped and sorted depending on some choice the user made upon starting up the report. According to the choice made, some other Sections should appear in between the grouped report data blocks. Solution Create a new BaseEnum, let’s call it ProjCust, with the different sorting and/or grouping possibilities, for example one to group by ProjId and one to group by CustAccount. Create the report Class. Define in the classDeclaration a DialogField and variable to handle the different sorting/grouping possibilities for the report. public class TutorialGroupReport_GroupReport
extends RunBaseReport
{
DialogField dialogReportBy;
ADUProjCustDlvDate reportBy;
#localmacro.CurrentList
reportBy
#endmacro
}
In the dialog method, the possibilities to sort/group the report data is shown.
public Object dialog()

{

    DialogRunbase dialog = super();

    ;

    dialog.addGroup("@SYS1046");
    dialogReportBy  =
      dialog.addFieldValue(TypeId(ProjCust),
                                   reportBy,
                                "@SYS55014");
    return dialog;

}
In the getFromDialog method, store the sorting/grouping option chosen by the end user
public boolean getFromDialog()
{

    ;
    reportBy    = dialogReportBy.value();     return super ();
}
Create a method to return the option chosen by the end user.
ProjCust reportBy()
{
    return reportBy;
}
Create an updateQuery method, which will adapt dynamically the report Query based on the option chosen by the end user
public Query updateQuery()
{

    Query                   query;
    QueryBuildDataSource    queryBuildDataSource;

    QueryBuildRange         queryBuildRange;
    ;
    query = queryRun.query();

    queryBuildDataSource =
             query.dataSourceTable(tableNum(ProjTable));     switch (this.reportBy())
    {

        case ProjCust::ProjId:
            queryBuildDataSource.addSortField(
                            fieldNum(ProjTable,ProjId));

            break;
        case ProjCust::CustAccount:

            queryBuildDataSource.addSortField(
                       fieldNum(ProjTable,CustAccount));
            queryBuildDataSource.addSortField(
                            fieldNum(ProjTable,ProjId));

            break;
        default:    // In default, error.

            throw error(strFmt("@SYS27147",
                         this.toString()));
    }

    return query;
}
Call the updateQuery method in the run method.
void run()
{

    ;

    this.updateQuery();     super();
}
Add the other appropriate methods to the class, such as a lastValueElementName, pack, unpack, description and main method.
Create the Report and the Design of it.
Add your report Class and the report DataSource to be grouped/sorted dynamically as variable the classDeclaration public class ReportRun extends ObjectRun
{
TutorialGroupReport_GroupReport tutorial_GroupReport;
ProjTable projTable;
}
Assign the caller to the report Class variable in the init method. public void init()
{
super(); tutorial_GroupReport = element.args().caller();
}
In the fetch method you can change the sorting/grouping dynamically based on the choice of the end user and if necessary add additional design stuff. public boolean fetch()
{
QueryRun queryRunProjTable;
ProjId parentProjId;
CustAccount custAccount;
;
queryRunProjTable = new QueryRun(
tutorial_GroupReport.updateQuery());
this.queryRun(queryRunProjTable);
while (queryRunProjTable.next())
{
projTable = queryRunProjTable.get(
tableNum(ProjTable));
switch (tutorial_GroupReport.reportBy())
{
case ProjCust::ProjId:
if (projTable.ParentId != parentProjId)
this.execute(1);
parentProjId = projTable.ParentId;
break;
case ProjCust::CustAccount:
if (projTable.CustAccount != custAccount)
this.execute(2);
custAccount = projTable.CustAccount;
break;
default: // In default, error.
throw error(strFmt("@SYS27147",
this.toString()));
}
this.send(projTable);
}
return true;
}
Continue reading......
by Patrik Luca
Delicious
0
Business requirement: show overwrite prices and discounts dialog for new SalesLine field If you add a new field to the SalesLine or SalesQuotationLine table, and this field is important for trade agreement evaluations, you should add some code for this field, to enable the Trade Agreement Evaluation functionality. Else, the dialog asking to Overwrite Prices And Discounts won’t appear upon changing this new field. 
Solution Add the new field to the Map PriceDiscResultFields and configure the necessary Mappings with the SalesLine and or SalesQuotationLine table. In method isTriggerFieldChanged from Map PriceDiscResultFields, add following code for your new field: …
boolean lineFieldChanged()
{
return _priceDiscResultFields.SalesPurchQty
!= priceDiscResultFieldsOrig.SalesPurchQty
|| _priceDiscResultFields.SalesPurchUnit
!= priceDiscResultFieldsOrig.SalesPurchUnit
|| _priceDiscResultFields.CurrencyCode
!= priceDiscResultFieldsOrig.CurrencyCode
|| _priceDiscResultFields.RecieptDeliveryDate
!= priceDiscResultFieldsOrig.RecieptDeliveryDate
|| _priceDiscResultFields.Price
!= priceDiscResultFieldsOrig.Price
// BEGIN
|| _priceDiscResultFields.YourNewField
!= priceDiscResultFieldsOrig.YourNewField;
// END
}
In Class SalesLineType, method validateField, add following code:
// BEGIN

case fieldNum(SalesLine, YourNewField):

    ok = salesLine.runPriceDiscPolicyDialog();

    break;

// END
Continue reading......
by Patrik Luca
Delicious
0
I decided to share all my interesting reads and resources month by month with my blog readers. You can find these posts by searching on the label Links. I'll try to order the resources in logical categories. If you would like to see some interesting stuff added in the next month, don't hesitate to post a comment. So this is my Links post for February 2012. Dynamics AX Freeware - MP3GAIN: MP3Gain analyzes and adjusts mp3 files so that they have the same volume.
Continue reading......
by Patrik Luca
Delicious
0
Problem description You may be searching for the Quantity tab on the Sales order form in Dynamics AX 2012 where you can find stuff like the Quantity Delivered, Invoiced, … for each sales line of the sales order, and not able to find it. It has been moved a bit in the AX 2012 release. Solution You can find it by selecting the General tab in the ribbon and choose Line quantity: a new form will open, having similar information with the previous AX versions. 
Continue reading......
by Patrik Luca
Delicious
0
Introduction In this post, I explain the different steps to generate a document using a Word template and the Office Add-ins for Dynamics AX 2012. Publish data sources You need the define which data sources from Dynamics AX, users are allowed to use in Office. - Go to Organization administration > Setup > Document management > Document data sources.
- Add the data source you want to use.
- Activate the data source by using the Activate button.
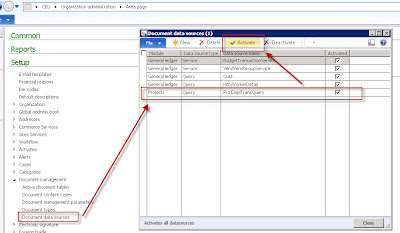
Connecting to the AOS Next, you need to define where to fetch the data from in Word, it is from which AOS. If there are multiple AOS instances, like for example a test, development, … environment, follow these steps: - Open Word, go to the Dynamics AX tab and click the Connection button. Open the Advanced section and fill out the Server and Port.
- Choose the Legal Entity from which data should be retrieved.
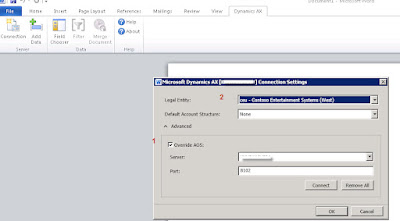
If you don’t know the Server and Port name, just find the configuration file you are using to start up Dynamics AX. Open it with Notepad and look for following information: 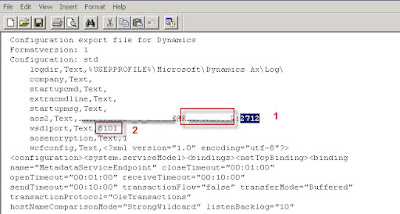
Remark 1= after the @ sign, you can find the AOS instance name. Remark 2 = the Port, so don’t fill out the Port you find after the : sign on the aos2 lign. Design the Word document In this example I’ll add a table to my Word document for repeating values of my ProjEmplTransQuery data source, to show hour transactions for a Project. Next, go to the Dynamics AX tab and choose Add Data. Select the ProjEmplTransQuery data source and hit OK. 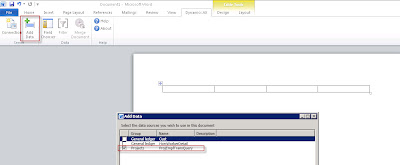
To the right, you’ll notice the fields of the chosen data source. As you can notice, if you add related tables to your data source, you can pick fields from multiple tables. Drag and drop the fields you want in your report in the columns of the Word table. If you drop them in the second row, automatically a header row will be created. 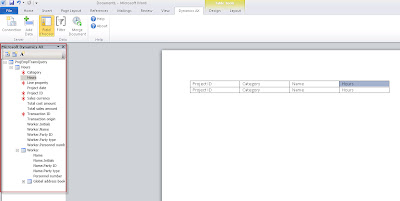
You can add whatever Word formatting style you like to your table, to make it look nice. Maybe it would be great to add a filter to the retrieved data, for example only for a specific project number: - Go to the Dynamics AX tab.
- Choose Filter.
- Add the appropriate filters.
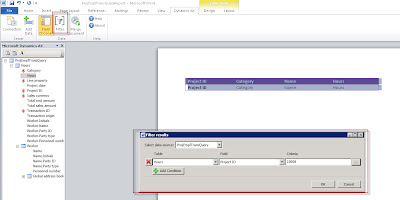
Next, save the Word document. Generating the report - Open the saved Word document.
- Go to the Dynamics AX tab.
- Choose Merge Document.
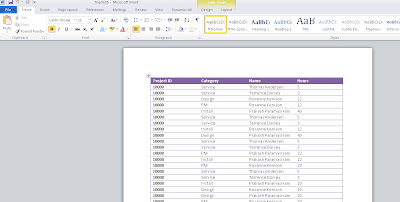
Adding additional data Another data source could be connected to the same Word document. In my example below, I’ve added the ProjTable data source. I use this data source to put some fields on my report, so no repeating table. To make sure, the fields are filtered the same way my rows in my table are (for the same project), I should add the same filter to my second data source: 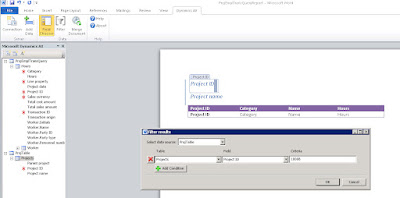
Rerun the report: 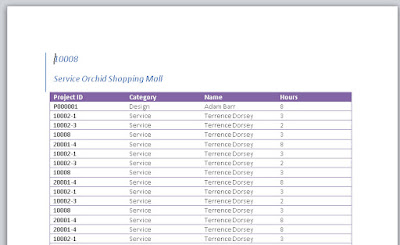
A remark: apparently, fields added a such to the Header or Footer of a Word document aren’t replaced by the Merge action. Just a pity, but apparently it ain’t working… Add the Word template to Dynamics AX - Remove the Filter from the Word document and save it.
- Upload your Word document to a SharePoint library.
- Go to Organization administration > Setup > Document management > Document types. Create a new Type and choose as Class Template library. Fill out the url of the SharePoint library to which you’ve uploaded the Word template in the field Document library. Activate it.
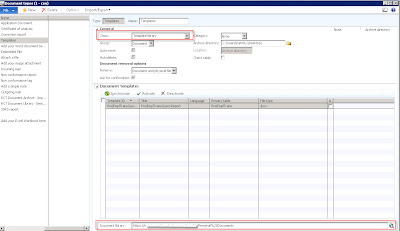
Once activated, each form containing a reference to the Primary table, will be able to generate the document. This is a problem as our Primary table currently is the ProjEmplTrans table. However, the ProjTable was included in our document aswell, so I would like to make this the Primary table. To do so, open the Word document, right click the ProjTable node, choose Properties and check the Use as primary query checkbox. 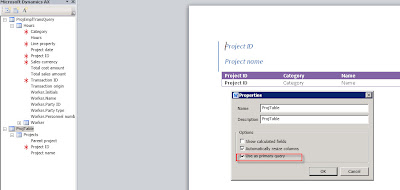
Remove the ProjEmplTransQuery anyway: it won’t filter on Project-Id as it ain’t the primary query. Re-upload your Word document to the SharePoint library and Synchronize the Document Type in AX with the library. Now the Primary table is ProjTable for this Word document. Add the generate from template buttons To be able to generate the document, some buttons should be added. The CustTable form has already the necessary buttons, so it is easiest to just copy it from there and paste it to your target form, in this example the ProjTable form: 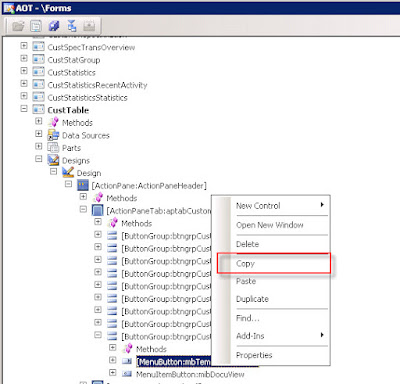
Some methods should be added on your target form, being classDeclaration: // classDeclaration
class FormRun extends ObjectRun
{
…
// BGN Office Add-ins
boolean isDocuActionTemplate;
// END Office Add-ins
}
The init method:
void init()
{
    …
    super()
    // BGN Office Add-ins
    isDocuActionTemplate =
        DocuActionForTemplate::createTemplateOnMenuButton(
                    mbTemplatesButton, projTable.TableId);
    …
    // END Office Add-ins

}
The run method: public void run()
{
…
docuActionTemplateUndefined.visible(
!isDocuActionTemplate);
}
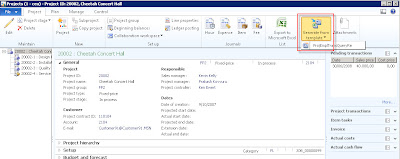
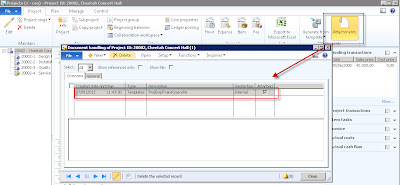
Now we can generate the document with as Filter the Project Id from the record selected in the Form. The document is generated and automatically attached to the record in the form:
Continue reading......
by Patrik Luca
Delicious
0
|


 View my profile


