My 2p about ERP Solutions, Information Worker Solutions and other software products (mainly Microsoft Dynamics AX and Microsoft SharePoint).

19 June 2008

Alerts not working for some users on some document libraries

Problem description: Alerts not working for some users on some document libraries


Some users were complaining that their alerts were not arriving for a specific document library. They did receive the intial alert to inform them about having activated the alert on the document library, but no alerts were arriving anymore upon changes in the document library.
For other document libraries, all alerts were working as they should.

Solution: add the Approve permission


The first thing I tried out was to set an alert for my own user on that particular document library. I received immediately the initial alert message in my mailbox. Then I uploaded a document, and I received immediately a new alert to inform me about the changes in the document library. Though the other users didn't receive an alert for this change.
I found an interesting blogpost about Troubleshooting alerts in Windows SharePoint Services 3.0 or Microsoft Office SharePoint Server 2007. So I tried all different suggestions, without any luck though.

Then I realised that my account was belonging to the Site Collection Administrators, while the other accounts not receiving alerts not. So I started searching the internet with this extra information and ran into another blogpost which actually solved my issue. I gave those users Approve permission on the document library and alerts were arriving for everybody upon changes in the document library.

Though this isn't really a good solution, as I cannot give everybody Approve permission to this document library, it solved at least the problem for the users collaborating on this document library and which had Contribute permission anyway. Adding the Approve permission for them, was no big deal in terms of security, as Approval was not activated for this document library. So they didn't get much more permissions with it. It still remains a problem for users who want to set an alert and should have only Read permission on the document library: or they will have more permissions, or their alerts won't arrive.


Continue reading......
by Patrik Luca 1 comments

18 June 2008

Extension to the Budgeting and Tracking Multiple Projects application template

Business Scenario


You have set up the Budgeting and Tracking Multiple Projects application template, one of the 40 fantastic Application Templates for Windows SharePoint Services 3.0.
You have created some Projects in the Projects List and some Project Tasks in the Project Tasks list.

You want to view these project tasks as a Microsoft Office Visio 2007 Flow Diagram. Moreover, you want to keep your Visio drawing in synch with the SharePoint list data.

Solution


Based on the MSDN article Integrating Visio 2007 and SharePoint Products and Technologies, I worked out following demo script:
  1. Start Microsoft Office Visio 2007.

  2. Create a new Visio file based on the Cross Functional Flowchart template. Choose the horizontal band orientation and 5 bands.

  3. Connect this Visio diagram to an external data source. We are going to connect it to our Project Tasks list in our SharePoint site, based on the Budgeting and Tracking Multiple Projects template.
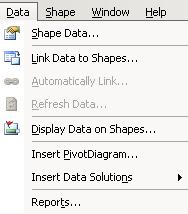
    1. Choose Data.

    2. Choose Link Data to Shapes
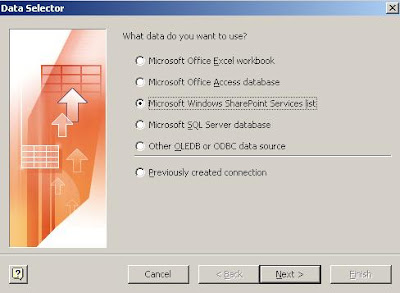
    3. Choose Microsoft Windows SharePoint Services list.

    4. Select the site on which your Project Tasks list is available.

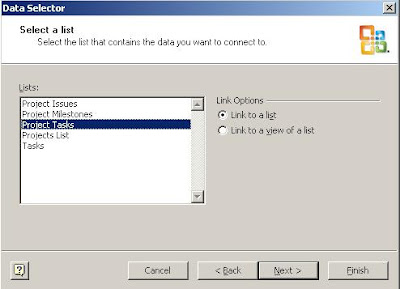
    5. Select the list Project Tasks
    6. Finish the wizard.

  4. Your data from your Project Tasks list are now linked in your Visio drawing.

  5. Put a Process block on your Visio drawing for each project task.

  6. Drag and drop the first Project Task from the External Data section to the first Process block on your Visio drawing. A little chain icon should appear in front of your first Project Task in the External Data section.

  7. Right-click the Process block and choose Data->Edit Data Graphic.

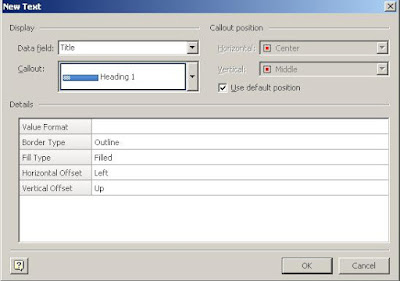
  8. Choose New Item->Text

  9. Choose as Data Field Title and as Callout Heading 1. Click OK.

  10. Add another Text Item, choose as Data Field Assigned To, as Callout Text callout and set the property Label Position to Not Shown. Click OK.

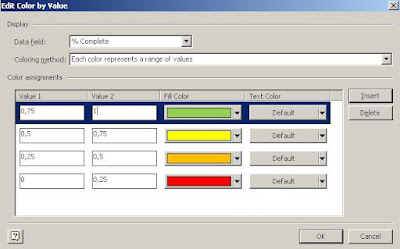
  11. Choose New Item->Color by Value.

  12. Choose as Data field % Complete and as Coloring method Each color represents a range of values. In the lower part of the screen you specify the ranges and their colors.

    Choose OK.

  13. You can add additional fields that you want to display in the Process block in the same manner. After having added all your desired fields, choose OK in the Edit Data Graphic form.

  14. Select this Process block and apply the same formatting to the other Process blocks in your Visio diagram by using the Format Painter (SHIFT+CTRL+P) functionality.

  15. Drag and drop the other Project Tasks in the External Data section to the other Process blocks on the Visio diagram.

  16. Connect your Process blocks using the Visio Connector Tool.

  17. Choose Format->Theme, and apply a Theme to your Visio diagram.

  18. Save your Visio diagram.


Now you have a Visio diagram which is linked to the Project Tasks SharePoint list.
Data changes on items in the SharePoint list will be reflected automatically in the Visio diagram. Moreover, we have added a coloring scheme to our Visio diagram, based on the % Complete column: this will result in a change of color for our Process blocks upon changing the % Complete value in our SharePoint Project Tasks list.


  1. Go to your Project Tasks list in SharePoint.

  2. Change some of the values for columns you have chosen to be displayed in your Visio diagram.
  3. Change the value for the % Complete column.

  4. (Re)open your Visio diagram.

  5. Choose Data->Refresh Data. Choose Refresh All.


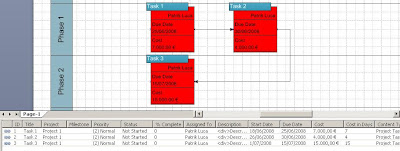
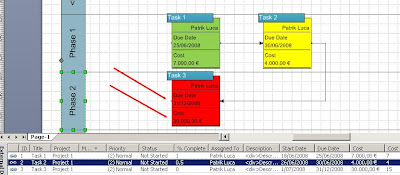
In my example, I have changed the Cost and Due Date for Task 3. I have changed also the % Complete for all of my Project Tasks as such that different color schemes should be applied for each of the Project Tasks, based on my settings in the previous steps. My Visio flowchart looks as follows after refreshing the data:


This offers great opportunities to visualize SharePoint list data by simply using Microsoft Office Visio 2007 and without code needs!


Continue reading......

by Patrik Luca 1 comments

05 June 2008

Change language for preformatted document libraries

You can add preformatted document libraries to your SharePoint sites easily. They give you an excellent example of how you can set up Microsoft Office Word 2007 templates with a document information panel containing metadata values based on the columns in your corresponding document library.
It is also an excellent example about how you can add these metadata values in your Word 2007 document through means of inserting Quick Parts. By editing the properties of your document in SharePoint, the update will be reflected immediately in your Word 2007 document and vice versa.

I ran into one problem however: after having installed the List templates in the List templates gallerie, they didn't become available in my site when I tried to create a new document library.

I soon realised it had something to do with the language settings: my site was not an English site, but the List templates are only available for download in English.

To create new document libraries based on these excellent examples of List templates in a non-English site, follow these steps:

  1. Change the .stp extension to .cab.

  2. Open the .cab-file with an archive tool, such as IZArc.

  3. Extract all files to a temporary directory.

  4. Open the manifest.xml file with an editor such as Microsoft Office SharePoint Designer 2007.

  5. Look for the Language node and change the lcid 1033 (for English) to the lcid of your choice.

  6. Drag and drop all extracted files into the .cab-file if you are using IZArc. If you are using another tool, just make a new .cab-file containing all the extracted files.

  7. Change the .cab extension to .stp. You can optionally choose to give the list template another name if you want to have it co-exist in the gallerie next to the English one.

  8. Upload the List template.

  9. You'll notice that the language column of your just uploaded list template reflects the value based on your chosen lcid in step 5.

  10. Go to the site created in the same language as your chosen lcid in step 5: you'll see that the list template becomes available in the new form under the Libraries section.


Continue reading......

by Patrik Luca 0 comments

03 June 2008

MOSS Faceted Search

MOSS Faceted Search: Functionality


On Codeplex, a great project MOSS Faceted Search is available. It is just a great set of webparts which enhances the search experience in value a lot for your end users.
It allows for drill down functionality in the search results based on so called facet values.
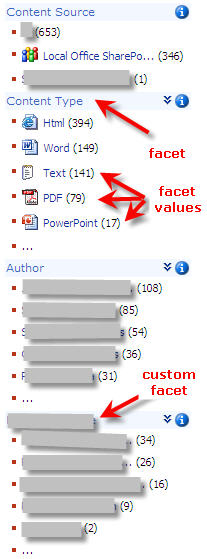
A facet is a category your items, documents, ... can belong to. When you install the default project, your items, documents, ... are immediately grouped in different categories / facets:
  • By Author

  • By Content Type

  • By Content Source

Off course, you can add your own facets.
Whenever a user executes a search, the search results are grouped by facet value within each facet.

It creates a great drill down experience for your end-user, who will be able to refine their search results easily this way, without having to know by heart all the facets and facet values. This is especially useful if one of your facets is a site column with as type lookup or choice. Your end-users will often not know exactly the different values available for the lookup or choice columns. But with this great solution, this is not needed anymore: the different values are shown as facet values if you implement the site column as facet. Upon clicking the facet value, it is added together with the facet in the search window.


MOSS Faceted Search: Installation


A detailed step-by-step installation guide can be downloaded here.

MOSS Faceted Search: Extra Configuration for facet icons


Upon the default installation, you'll notice that some facet values are displayed with their appropriate icon. I've extended this a bit with some additional icons. To implement it, follow these steps:
  1. Put your search results page on which you have added the Search Facets webpart in edit mode.

  2. Choose Modify Shared Web Part on the Search Facets webpart.

  3. Expand the Results display group.

  4. Copy-paste the contence of the field Select Columns for Facets to an editor as Notepad, Visual Studio or SharePoint Designer.

  5. Add following lines in the Mappings node within the Content Type Column node:
    <Mapping Match="application/pdf" DisplayName="PDF" Image="pdficon.gif"/>
    <Mapping Match="application/x-zip-compressed" DisplayName="Zip Archive" Image="iczip.gif"/>
    <Mapping Match="application/vnd.ms-powerpoint%" DisplayName="PowerPoint" Image="icpptx.gif" />
    <Mapping Match="application/vnd.ms-word%" DisplayName="Word" Image="icdocx.gif" />
    <Mapping Match="image/jpeg" DisplayName="JPEG Image" Image="icjpg.gif" />
    <Mapping Match="application/rtf" DisplayName="Rich Text Format" Image="icrtf.gif" />
    <Mapping Match="image/tiff" DisplayName="TIF Image" Image="ictif.gif" />
    <Mapping Match="application/x-mspublisher" DisplayName="Publisher" Image="icpub.gif" />

  6. Copy-paste the adapted contence back to the contence of the field Select Columns for Facets.

  7. Save your changes.

This will add icons for PDF files, for zip archives, for all PowerPoint and Word documents, for JPEG and TIF images, for RTF files and for Publisher files.

Remark: it assumes you have added a PDF icon to the 12\Template\Images hive on your Microsoft Office SharePoint Server 2007 and that the icon is called pdficon.gif.


Continue reading......

by Patrik Luca 0 comments

22 May 2008

Restore subsite: parent web does not exist

Problem description: during restore of a subsite following error occurs: parent web does not exist


I had exported a subsite having over 50 subsites beneath it using the stsadm -o export command. Upon importing the hence created backup file using the stsadm -o import command on another server, a fatal error occurs. The error logged is: FatalError: The file cannot be imported because its parent web <URL name of the exported subsite> does not exist.

Solution: do the import as site collection administrator


My first thought was that I needed to create a blank site with the same URL name before importing my subsite. So I gave it a try: my import started better, but it failed again, on the first of the more than 50 subsites beneath my "parent" subsite. So I created again a blank site for this sub-subsite. My import went already some further, but then it failed -off course- on the second of the more of 50 sub-subsites. I couldn't believe I would need to create my complete site hierarchy before being able to import my backup of a subsite. Then I tried to do the import with another user account, and hey, the import ran smoothly without any errors. So what was the difference: my second account was a member of the site collection administrators group.
Conclusion: running an import of a backup of a subsite should be done with a user account being member of the site collection administrators group, else you get some cryptic error messages and a failure of your restore operation.


Continue reading......

by Patrik Luca 20 comments

19 May 2008

Installing the IEE Forms Based Authentication Solution

The CKS:Internet/Extranet Edition has released a pre-beta release of a Forms Based Authentication Solution.

This set of great features adds some missing out-of-the box functionality in Microsoft Office SharePoint Server 2007. The solution can be downloaded at Codeplex.
The functionality I like the most is:


  • Ability for external users who authenticate themselves through forms based authentication to change their password through a web part. The web part is highly customizable in terms of error messages and labels.

  • Ability for the SharePoint administrator to add external users who will authenticate through forms based authentication within the site settings of your site collection. There is no need to set up an extra website for user management, nor to do the administration of users directly in a database.


After installing the set of features, I had some problems though.

  • In the user management pages, I could not get an overview of already created users. The UsersDisp.aspx threw an Unknown error.

  • Some of the other user management pages had the same problems.


The solution is already available, but unfortunately is not yet included in the downloadable pre-beta version of the Forms Based Authentication Solutions. I found the working .aspx pages in a blogpost on the Van Laan on Sharepoint and all things Microsoft blog. From there the working .aspx pages can be downloaded. Just copy-paste the downloaded pages over the installed .aspx pages in the 12 hive under TEMPLATE\LAYOUTS\FBA\MANAGEMENT.

In the same blogpost, I found a great tip to change the default view of those user management pages, which display only 5 users at a time: it is very easy to change this to more users on one page.

As my external users were now able to change their password, I wanted to enforce a certain minimal password policy. To achieve this, I changed the web.config file of my web application set up with forms based authentication.
Look for the providers tag in the web.config: you'll find the add name tag, which specifies your provider for forms based authentication. In it, you'll find some properties which you can change to set up a password policy such as:

  • minRequiredPasswordLength: the number specified is the minimal length for a valid password

  • minRequiredNonalphanumericCharacters: the number specified is the minimul non-alphanumeric characters which the password must contain.


To activate this new policy, you should remove your previous definition of your provider. This can be achieved by adding a remove name tag, as shown in the screenshot below.


Continue reading......

by Patrik Luca 1 comments

14 May 2008

Limited number of subsites automatically added to Quick Launch

Business requirement: show more than 50 subsites in the Quick Launch


You can check the box Show subsites in the Subsites and Pages section of the Site Navigation Settings for a site. By doing so, each added subsite beneath that site will be added automatically to the Quick Launch navigation element. However, this is limited to 50 subsites. Once you are adding the 51th subsite, it will not be added anymore automatically to the Quick Launch. This can be pretty confusing for your end-users. Especially if you are having fly-out menus in the Global Navigation element on top op the page (there the 51th or above subsite won't appear either).

Solution: add additional subsites manually to the Quick Launch navigation element


The problem is not that Microsoft Office SharePoint Server 2007 is not able to handle more than 50 Quick Launch links. It just stops adding automatically subsites once the limit of 50 subsites is reached. Hence you should add the 51th and above subsite manually to the Quick Launch links.

  1. On the home page for the site, click the Site Actions menu.

  2. Choose Site Settings.

  3. Choose Navigation.

  4. In the Navigation Editing and Sorting section, choose Add link...

  5. Fill out the appearing form to add a Quick Launch link to your 51th or above subsite.


Your additional subsites will appear in the Quick Launch navigation element and if activated, in your fly-out menu in the Global Navigation aswell.


Continue reading......

by Patrik Luca 4 comments

Patrik Luca, Ieper, BELGIUM
Feel free to use or spread all of the content on my blog. In return, linking back to my blog would be greatly appreciated. All my posts and articles are provided "AS IS" with no warranties.

Subscribe feeds via e-mail
Subscribe in your preferred RSS reader

Subscribe feeds rss Most Read Entries

Categories

Recommended Books


Subscribe feeds rss Recent Comments

This Blog is part of the U Comment I Follow movement in blogosphere. Means the comment field of this blog is made DOFOLLOW. Spam wont be tolerated.

Blog Archive

My Blog List

Followers

Links