My 2p about ERP Solutions, Information Worker Solutions and other software products (mainly Microsoft Dynamics AX and Microsoft SharePoint).

29 April 2008

Display all your alerts

Business requirement: display all your alerts


A missing feature in Microsoft Office SharePoint Server 2007 is the possibility to display all the alerts you have set up. After a while, an end-user has subscribed himself to multiple lists, document libraries and items. The end-user forgets which alerts he has set up so far, resulting in setting up twice the same alert etc. An end-user likes also to have an overview on which he can easily modify or delete alerts. The out-of-the box functionality requires to go to each list or document library, on which the end-user has activated his alert, to modify or delete existing alerts.

Solution: Install My Alerts web part


René Hezser created a great web part which provides this functionality, called My alerts.
To install René Hezsers My alerts web part, follow these steps:

  1. Create a .bat file with following code:
    echo off
    path = "C:\Program Files\Common Files\Microsoft Shared\web server extensions\12\BIN\"
    echo Deleting old solution
    stsadm.exe -o deletesolution -name "RH.MyAlerts.wsp" -override
    echo Adding solution
    stsadm.exe -o addsolution -filename "RH.MyAlerts.wsp"
    echo Deploying solution
    stsadm.exe -o deploysolution -name "RH.MyAlerts.wsp" -allcontenturls -immediate -allowgacdeployment -force
    echo Running timer jobs to finish deployment
    stsadm.exe -o execadmsvcjobs


    Echo Please enter the url to the site collection to which you want to activate the feature to:
    set /p SitePath=
    stsadm.exe -o activatefeature -name "MyAlerts" -url %SitePath% -force
    echo RH.MyAlerts.wsp Solution installed.

  2. Run the .bat file created in the previous step to install and deploy the feature in your farm.

  3. Install the web part to the global assembly cache (GAC)


    1. Start the Visual Studio Command Prompt (in the program group Visual Studio Tools).

    2. Go to the directory where the dll is installed (typically c:\Inetpub\wwwroot\wss\VirtualDirectories\80\bin).

    3. Run the command gacutil /i RH.MyAlerts.dll


  4. Run iisreset.


If you receive following error upon adding the My Alerts web part to a page: Unable to add selected web part(s). My Alerts: Cannot import this Web Part, then your trust level is not set correctly for the My Alerts web part. Most likely, your installation of the webpart to the GAC was not succesful. For more information about SharePoint web part security you can read this post from Brett Burley.


Continue reading......

by Patrik Luca 4 comments

08 April 2008

Fill field by default with current user

Business requirement: how to fill a field by default with the current user?


Having set up the Help Desk template (one of the 40 application templates), my end-users asked if the field Customer could be filled up by default with the user creating the service request. The Customer field should only be filled up by default if the creator of the service request didn't fill out a value himself. The option should left open for the end-user to create a service request for somebody else: in such a case the end-users still needed to be able to fill out a value themselves (being the login of the colleague for whom they were submitting a service request).

Solution: use a workflow to set the default user to the current user


Part 1: Set customer column not required


  1. Set the column setting Require that this column contains information to No.


Part 2: Create a workflow to set the default user to the current user


  1. Create a new workflow in Microsoft Office SharePoint Designer 2007: File->New->Workflow.

  2. Give a name for the workflow, attach it to the Service Requests SharePoint list and check the option Automatically start this workflow when a new item is created.

  3. Check for the condition If Customer is empty

  4. As Action choose Set Field in Current Item

    1. Choose the field Customer.

    2. For the value, choose User who created current item (it will be translated by Microsoft Office SharePoint Designer 2007 to Service Requests:Created By.


  5. Click Finish


Continue reading......

by Patrik Luca 5 comments

04 April 2008

Document Information Panel: not all values available for a lookup field

Problem description: Not all values available for a lookup field in the Document Information Panel


I ran into a problem where not all values were available in the Document Information Panel for a certain field. This field was a lookup field to a SharePoint list. The field was defined as a Multiple-Selection List Box in the Document Information Panel.

Solution: Change the Item Limit in the default view on the SharePoint list.


The cause of this problem was the default view defined on the SharePoint list. The number of items displayed in the Item Limit was limited: only those values were shown in the Document Information Panel. Increasing this Item Limit as such that all items were displayed in the default view of the SharePoint list resulted also in displaying all available values in the Document Information Panel for the Multiple-Selection List Box.


Continue reading......

by Patrik Luca 5 comments

31 March 2008

Bar Graphs in SharePoint

I ran into a great blogpost by Paul Galvin about creating bar graphs in SharePoint by use of the Data View Web part. You just need some knowledge about tweaking the XSLT.

Must read for anybody wanting to make graphical overviews of data in SharePoint lists with status columns for your manager.


Continue reading......

by Patrik Luca 0 comments

24 March 2008

Extension to the Rooms and Equipment Reservation application template

Business Scenario


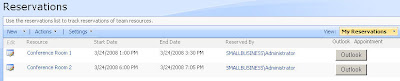
You have set up the Room and Equipment Reservations application template. Some resources are created, for example:
  • Resource Name: Conference Room 1; Resource Type:Conference Room
  • Resource Name: Conference Room 2; Resource Type:Conference Room

Some of your end-users start creating reservations, for example:
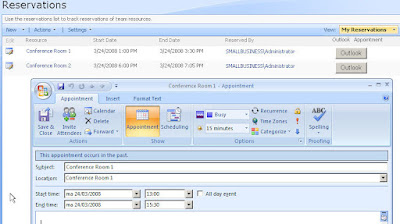
  • Start Date: 24-03-2008 1 PM 00
  • End Date: 24-03-2008 3 PM 30
  • Resource: Conference Room 1

Those users would like to send out an appointment with Microsoft Outlook right away from within SharePoint, taking into account the data they have already provided upon creation of the reservation in SharePoint.

Solution


To achieve this, I combined some of my SharePoint knowledge, with a Javascript snippet I found on the web written by Brian White.

As prerequisite for the solution, Microsoft Outlook should be installed on the client machine with which the SharePoint site is being accessed.
  1. Open the MyReservations.aspx page with Microsoft SharePoint Designer 2007.
  2. Right-click the ListViewWebPart and choose Convert to XSLT Data View.

     
  3. Right-click the last column of the created grid, and choose Insert -> Column to the Right
  4. Give the column the title Outlook Appointment.
  5. Go to the code view.
  6. Insert right after the PlaceHolderMain tag following code snippet:
    <script type="text/javascript">

    function createOutlookAppointment(title,meetinglocation,startdate,enddate)
    {

    newAppt = new appt(title, meetinglocation, formatIncomingDateTime(startdate),
    formatIncomingDateTime(enddate));

    saveAppt( newAppt );
    }
    function formatIncomingDateTime(incomingDateTime){

    var datePart = incomingDateTime.substring(0,10);
    var timePartHours = incomingDateTime.substring(11,13);
    var timePartMinSecs = incomingDateTime.substring(13,16);

    timePartHoursInt = parseInt(timePartHours,10) + 1;
    timePartHours = timePartHoursInt.toString();
    return datePart.concat(' '.concat(timePartHours).concat(timePartMinSecs));
    }

    function appt( Subject, Location, Start, End){

    this.Subject = Location;
    this.Location = Location;
    this.Start = Start;
    this.End = End;


    this.ReminderMinutesBeforeStart = 15;
    }
    function saveAppt( obj ){

    var olAppointmentItem = 1;

    out = new ActiveXObject( "Outlook.Application" );

    appt = out.CreateItem( olAppointmentItem );

    appt.Subject = obj.Subject;
    appt.Location = obj.Location;
    appt.Start = obj.Start;
    appt.End = obj.End;


    appt.ReminderMinutesBeforeStart = obj.ReminderMinutesBeforeStart;

    appt.Display();
    return null;
    }
    </script>


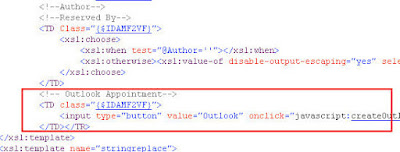
  7. Go to the <td> tag of your newly created column (search for Reserved By, it will be a couple of lines beneath it). Add a button which will execute previously created code snippet:
    <input type="button" value="Outlook" 
    onclick="javascript:createOutlookAppointment('{@Title}','{@Resource}',
    '{@RERStartDate}','{@REREndDate}');return true;"/>


As a result the users will have next to each reservation a button.


Clicking on the button will create a Microsoft Outlook appointment with the data previously entered upon creation of the reservation in Microsoft SharePoint.


You can extend the Reservations list, by adding additional columns, whose data could be added upon creation of the Microsoft Outlook appointment.


Continue reading......

by Patrik Luca 33 comments

08 March 2008

40 application templates: where are the site content types?

Upon using one of the 40 application templates provided by Microsoft, you may be wondering where the site content types are, with which these templates are build. The site content types belong to the site content type group _Hidden: hence they are not visible on the site content types page.

This can be annoying in following scenarios:

  • If you want to create a new site content type which has as parent content type one of those hidden site content types, you can't.

  • If you want to limit the data displayed in a Content Query Web Part on a certain page in your sites, you cannot filter on the Content Type for those hidden site content types.

To move the site content types included in the 40 application templates out of the _Hidden site content type group, follow these steps:
  1. Go to the directory %Program Files%\Common Files\Microsoft Shared\web server extensions\12\TEMPLATE\FEATURES\TSATypes

  2. Open the CTypes.xml file with an editor.

  3. Search for the Site Content Type that you would like to make visible in the GUI. I'll give the example with the Service Request Site Content Type of the Helpdesk Application Template.

  4. In the Content Type tag, replace the value for the site content type group (which is set to _Hidden) with the value $Resources:core,List_Content_Types;

  5. Execute following script (it deactivates and reactivates the tsatypes feature and executes an iisreset:
    echo off
    @set PATH=C:\Program Files\Common Files\Microsoft Shared\web server extensions\12\BIN;%PATH%
    @if "%1"=="" (goto invalidParameters)
    stsadm -o deactivatefeature -filename "tsatypes\feature.xml" -url %1
    stsadm -o activatefeature -filename "tsatypes\feature.xml" -url %1
    iisreset
    @goto endOfBatch
    :invalidParameters
    @echo Please call with the correct parameters.
    @echo The correct syntax of this command is:
    @echo tsatypes [siteurl]
    :endOfBatch


Go to Site Actions -> Site Settings -> Site content types: the Service Request Site Content Type is visible on the page in the group List Content Types. Hence it can be used as parent content type for new site content types.

In the Content Query Web Part, the Service Request Site Content Type can be chosen to filter on: choose List Content Types in the dropdown box Show items of this content type group and choose the Service Request Site Content Type in the dropdown box Show items of this content type.


Continue reading......

by Patrik Luca 3 comments

24 February 2008

Advanced filtering on a Dynamics AX Web Form published in a SharePoint environment

When you have Enterprise Portal configured within your SharePoint environment, it is possible to open your ERP data from Microsoft Dynamics AX towards every user having access to the SharePoint environment. This can be achieved by making use of Web Forms. Web Forms have no filtering possibilities compared to the regular forms in the Microsoft Dynamics AX client. End-users are only able to sort records displayed in a Web Form.
To enable advanced filtering possibilities on Web Forms, you should do a little coding in your Web Form in the Microsoft Dynamics AX environment and you should create a Web Page to display your Web Form in your SharePoint environment.
The steps to follow in your Microsoft Dynamics AX environment:


  1. Create a New Web Form

  2. Add a Datasource to the Data Sources node of the created Web Form (f.e. CustTable).

  3. Add two WebGroup controls to the Design node of the created Web Form: Filter and Grid.

  4. Add a WebGrid control to the WebGroup control Grid and add some fields of the CustTable Data Source to the WebGrid (f.e. AccountNum, Name, CustGroup and ZipCode). Set the property AllowEdit to No for each field.

  5. Set following properties to following values for the added WebGrid control

    • DataSource: CustTable

    • ShowNavigationButtons: Yes

    • VisibleRows: 25

  6. Add two WebEdit controls to the WebGroup control Filter: call them FilterName and FilterCustGroup. Set the property AutoDeclaration to Yes and the Extended Data Type to Name and CustGroupId.

  7. Add a WebButton control (Submit) to the WebGroup control Filter.

  8. Adapt the classDeclaration of the created Web Form as follows:
    public class FormWebRun extends ObjectRun
    {
    QueryBuildRange NameQBR;
    QueryBuildRange CustGroupQBR;
    Name name;
    CustGroup custGroup;
    #define.Name('WebForm_Name')
    #define.CustGroup('WebForm_CustGroup')
    }

  9. Adapt the init method of the CustTable Data Source as follows:
    public void init()
    {
    super();
    NameQBR = this.query().dataSourceNo(1).addRange(fieldNum(CustTable,Name));
    CustGroupQBR = this.query().dataSourceNo(1).addRange(fieldNum(CustTable,CustGroup));
    }

  10. Adapt the executeQuery method of the CustTable Data Source as follows:
    public void executeQuery()
    {
    ;
    if(name)
    {
    NameQBR.value(name);
    }
    else
    {
    NameQBR.value(FilterName.text());
    name = FilterName.text();
    }
    if(custGroup)
    {
    custGroupQBR.value(custGroup);
    }
    else
    {
    CustGroupQBR.value(FilterCustGroup.text());
    custGroup = FilterCustGroup.text();
    }
    super();
    }

  11. Adapt the clicked method of the Submit Web Button as follows:
    void clicked()
    {
    name = FilterName.text();
    custGroup = FilterCustGroup.text();
    CustTable_ds.executeQuery();
    super();
    }

  12. Adapt the saveViewState method as follows:
    public void saveViewState()
    {
    super();
    if(Name)
    {

    this.viewStateItem(#Name,name);
    }
    if(CustGroup)
    {
    this.viewStateItem(#CustGroup,custGroup);
    }
    }

  13. Adapt the loadViewState method as follows:
    public void loadViewState()
    {
    super();
    if(this.viewStateContains(#Name))
    {
    Name = this.viewStateItem(#Name);
    }
    if(this.viewStateContains(#CustGroup))
    {
    custGroup = this.viewStateItem(#custGroup);
    }
    }

  14. Create a Web Content->Display item for your created Web Form.


So far what is needed in your Microsoft Dynamics AX environment. Your created objects should look like this:

In our SharePoint environment, we need to display the data to our SharePoint end-users. To achieve this, follow these steps:

  1. Create a New Web Part Page.
  2. Add the Web Form Web Part to the page.
  3. Click Modify Shared Web Part.
  4. In the Dynamics Properties part, choose the menu item previously created in the WebDisplayContentItemName dropdown box.


Your SharePoint end-users are now able to use advanced filtering (wildcard filters, ...) on the Name and CustGroup field of the CustTable just like the Dynamics AX end-users can in the Microsoft Dynamics AX Client. By clicking the Submit button, the records in the CustTable Web Form are filtered, taking into account the filter values entered in the WebGroup Filter control.


Continue reading......

by Patrik Luca 3 comments

Patrik Luca, Ieper, BELGIUM
Feel free to use or spread all of the content on my blog. In return, linking back to my blog would be greatly appreciated. All my posts and articles are provided "AS IS" with no warranties.

Subscribe feeds via e-mail
Subscribe in your preferred RSS reader

Subscribe feeds rss Most Read Entries

Categories

Recommended Books


Subscribe feeds rss Recent Comments

This Blog is part of the U Comment I Follow movement in blogosphere. Means the comment field of this blog is made DOFOLLOW. Spam wont be tolerated.

Blog Archive

My Blog List

Followers

Links