X++ code
Add following extra variables in the beginning of the job:
SysExcelStyles                  styles;
SysExcelStyle                   style;
SysExcelFont                    font;
SysExcelCells                   cells;
After having created the workbook, create a new style as follows:
styles = sysExcelWorkBook.styles();
// Create new style
style = styles.add('Header');
// Set font for this style to bold
font = style.font();
font.bold(true);
font.color(255);
Right after having created the title row on the first worksheet, set its style to our created Header style.
// Set the title row in the Header style
sysExcelWorksheet.rows().item(1).style('Header');
For each added worksheet with backorder lines, set the style of the title row also to our created Header style.
// Set the title row in the Header style
sysExcelWorksheetBackOrder.rows().item(1).style('Header');
Set the column width to autofit for the first worksheet.
// Set the column width to autofit
sysExcelWorksheet.columns().autoFit();
Set the column width to autofit for each added worksheet with backorder lines. Make sure you do this after you have added all rows in the worksheet, so it can take into account the width of the largest value in your column.
// Set the column width to autofit
 sysExcelWorksheetBackOrder.columns().autoFit();
Format the fourth column (Deliver Remainder) for each added worksheet with backorder lines as a Number with two decimal places.
// Format the 4th column to a Number with 2 decimal places
cells = sysExcelWorksheetBackOrder.cells();
cells.range('D2:D99').numberFormat("0,00");
The complete job looks then like this:
static void ExportToExcel(Args _args)
{
    #AviFiles
    SysOperationProgress    progress = new SysOperationProgress();
    SysExcelApplication     sysExcelApplication;
    SysExcelWorkbooks       sysExcelWorkBooks;
    // Filename to which you will be writing your data
    FileName                fileName = "C:\\Windows\\Temp\\ExportToExcel.xlsx";
    SysExcelWorkbook        sysExcelWorkBook;
    SysExcelWorkSheets      sysExcelWorkSheets;
    SysExcelWorkSheet       sysExcelWorkSheet;
    SysExcelWorkSheet       sysExcelWorksheetBackOrder;
    SysExcelWorksheet       sysExcelWorkSheetToBeDeleted;
    SysExcelStyles          styles;
    SysExcelStyle           style;
    SysExcelFont            font;
    SysExcelCells           cells;
    int                     row = 1;
    int                     rowBackOrder;
    CustTable               custTable;
    SalesTable              salesTable;
    SalesLine               salesLine;
    boolean                 workSheetAdded = false;
    int                     nbrOfCustomers;
    ;

    // Initialising progress bar
    progress.setCaption("Export To Excel in progress...");
    progress.setAnimation(#AviTransfer);
    // Initialisation of some objects
    sysExcelApplication = SysExcelApplication::construct();
    // Create new workbook
    sysExcelWorkBooks = sysExcelApplication.workbooks();
    sysExcelWorkBook = sysExcelWorkBooks.add();
    // Create new style
    styles = sysExcelWorkBook.styles();
    style = styles.add("Header");
    // Set font for this style to bold and color to red
    font = style.font();
    font.bold(true);
    font.color(255);
    // Get worksheets collection
    sysExcelWorkSheets = sysExcelWorkbook.worksheets();
    // Excel visible on desktop running the job or not?
    sysExcelApplication.visible(false);
    // Newly created Excel files have by default some worksheets
    // Delete those worksheets created by default
    while(sysExcelWorkSheets.count() > 1)
    {
        sysExcelWorkSheetToBeDeleted = sysExcelWorkSheets.itemFromNum(2);
        sysExcelWorkSheetToBeDeleted.delete();
    }
    // Add as many worksheets as there are customers
    select count(RecId) from CustTable;
    sysExcelWorkSheet = sysExcelWorkSheets.add(null,null,CustTable.RecId);
    // Add another worksheet
    sysExcelWorkSheet = sysExcelWorkSheets.add();
    //Rename the first worksheet
    sysExcelWorkSheet.name("Customers");
    // Make a title row
    // set a value in cell on row 1 column 1
    sysExcelWorkSheet.cells().item(1,1).value("Customer account");
    // set a value in cell on row 1 column 2
    sysExcelWorksheet.cells().item(1,2).value("Name");
    // set the title row in the Header style
    sysExcelWorksheet.rows().item(1).style("Header");
    while select custTable
    {
        progress.setText(strfmt("Customer %1", custTable.Name));
        row++;
        rowBackOrder = 1;
        sysExcelWorksheet.cells().item(row,1).value(custTable.AccountNum);
        sysExcelWorksheet.cells().item(row,2).value(custTable.Name);
        while select salesLine
        where salesLine.SalesStatus             == salesStatus::Backorder
        && salesLine.ConfirmedDlv               < Today()
        && salesLine.RemainSalesPhysical        > 0
        join salesTable
        where salesTable.SalesId                == salesLine.SalesId &&
        salesTable.CustAccount                  == custTable.AccountNum
        {
            if(!workSheetAdded)
            {
                // Use the next Excel worksheet and rename it
                sysExcelWorksheetBackOrder = sysExcelWorkSheets.itemFromNum(
                    row);
                //Name of worksheet can have maximum 31 characters
                sysExcelWorksheetBackOrder.name(substr(custTable.Name,1,31));
                workSheetAdded = true;
                // Make a title row
                // set a value in cell on row 1 column 1
                sysExcelWorksheetBackOrder.cells().item(1,1).value(
                    "Ship Date");
                // set a value in cell on row 1 column 2
                sysExcelWorksheetBackOrder.cells().item(1,2).value(
                    "Item Number");
                // set a value in cell on row 1 column 3
                sysExcelWorksheetBackOrder.cells().item(1,3).value(
                    "Item Name");
                // set a value in cell on row 1 column 4
                sysExcelWorksheetBackOrder.cells().item(1,4).value(
                    "Deliver Remainder");
                // set the title row in the Header style
                sysExcelWorksheetBackOrder.rows().item(1).style("Header");
            }
            rowBackOrder++;
            sysExcelWorksheetBackOrder.cells().item(rowBackOrder,1).value(
                salesLine.ConfirmedDlv);
            sysExcelWorksheetBackOrder.cells().item(rowBackOrder,2).value(
                salesLine.ItemId);
            sysExcelWorksheetBackOrder.cells().item(rowBackOrder,3).value(
                InventTable::find(salesLine.ItemId).ItemName);
            sysExcelWorksheetBackOrder.cells().item(rowBackOrder,4).value(
                salesLine.RemainSalesPhysical);
        }
        // Set the column width to autofit
        sysExcelWorksheetBackOrder.columns().autoFit();
        // Format the 4th column as Number with 2 decimal places
        cells = sysExcelWorksheetBackOrder.cells();
        cells.range("D2:D99").numberFormat("0,00");
        workSheetAdded = false;
    }
    // Set the column width to autoFit
    sysExcelWorksheet.columns().autoFit();
    // Suppress the pop-up window:
    // A file named foo already exists in this location. Do you want to replace it?
    sysExcelApplication.displayAlerts(false);
    // Save the Excel file
    sysExcelWorkbook.saveAs(fileName);
    sysExcelWorkBook.comObject().save();
    sysExcelWorkBook.saved(true);
    // Make sure you close the Excel application
    // Especially if you run the job without showing Excel on the desktop
    // (sysExcelApplication.visible(false))
    sysExcelApplication.quit();

}
The result should look like this if you execute the job on the demo data in Microsoft Dynamics AX 2009 with Microsoft Excel 2007:
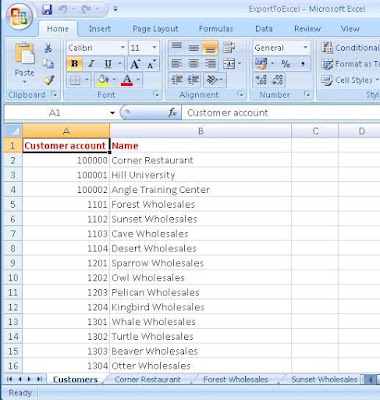
This is the first worksheet in my Excel workbook with the complete list of my customers in it.

This is one of the other worksheets, being the one created for customer Forest Wholesales and showing all the backorder lines for this particular customer.


