My 2p about ERP Solutions, Information Worker Solutions and other software products (mainly Microsoft Dynamics AX and Microsoft SharePoint).

31 March 2010

Links List March 2010

I decided to share all my interesting reads and resources month by month with my blog readers. You can find these posts by searching on the label Links. I'll try to order the resources in logical categories. If you would like to see some interesting stuff added in the next month, don't hesitate to post a comment.

So this is my Links post for March 2010.

Dynamics AX


Continue reading......

by Patrik Luca 0 comments

27 March 2010

Equivalent for valueStr in Axapta 3.0 SP1

Introduction

In Dynamics AX, you can use valueStr to get the string value of a ComboBox control on a Form. In Axapta 3.0 SP1, this method doesn’t exist.

Example in Dynamics AX 2009

  1. Create a new form.
  2. Add a ComboBox control in the Design node.
  3. Set property EnumType of the added ComboBox to ProjType.
  4. Set property AutoDeclaration to Yes for the added ComboBox.
  5. Add a Button control in the Design node.
  6. Override the Clicked method of the Button control as follows:
    void clicked()    
    {
        super();
        info(ComboBox.valueStr());

    }


In Dynamics AX 2009, you’ll get the value of the EnumType as string.


Equivalent in Axapta 3.0 SP1


Unfortunately, this ain’t working in Axapta 3.0 SP1.


To achieve the same in Axapta 3.0 SP1, override the Clicked method of the Button control as follows:


void clicked()
{
    super();
    info(
     new
      SysDictEnum(
enumnum(ProjType)).index2Name(
ComboBox.selection()));

}


Continue reading......

by Patrik Luca 0 comments

20 March 2010

Customizing Infolog System in Dynamics AX

Business Requirement: go to other form

The Infolog System can be easily customized in Dynamics AX. You can attach actions to the displayed messages in the infolog. Upon double clicking the message you could for example go to another form, related to the displayed message. On MSDN, you can find some information about Using the Infolog System.

Solution: using the SysInfoAction_TableField class

Using the SysInfoAction_TableField class, you can easily add this functionality in your displayed messages. The job beneath shows first a normal information message. The second information message however can be double clicked by the end-user. Double cliking it will open the Customer form on the Customer determined in the X++ code. (in stead of double clicking, the end-user could aswell click the Show button in the Infolog).


static void customizeInfolog(Args _args)
{
CustTable custTable;
;

select firstOnly custTable
where custTable.AccountNum == "1301";

info(strFmt("Normal info message about customer %1"
,custTable.Name));
info(strFmt("Information message opening the CustTable "
+ "Form on customer %1 upon double clicking "
+ "the information message"
,custTable.Name)
,""
,SysInfoAction_TableField::newBuffer(custTable));
}


Continue reading......

by Patrik Luca 1 comments

08 March 2010

Changing background color for forms by company account

Business Requirement: Forms should have a different colored background by company account

When users are working in different company accounts in Dynamics AX, it isn’t always obvious to know in which company account they’re working. Off course they can see it in the Status bar if they have checked the Show company accounts flag. Off course, they can see it too in the Address field of the Address bar, but both options can be easily overlooked, resulting in modifying data in the wrong company account. This post explains how to implement a solution which changes the background color of each form in each company account. This can be activated on a user by user basis.

Solution: Changing background color by company account

Step 1: New Extended Data Type

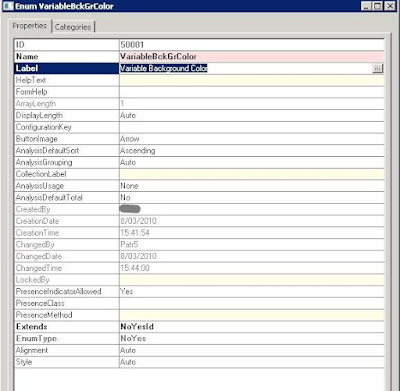
Create a new Extended Data Type VariableBckGrColor which extends NoYesId.

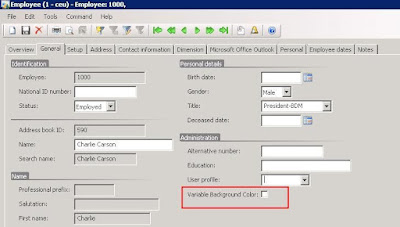
Step 2: New field on Employee Table

Drag and drop the previously created Extended Data Type on the Fields node of the EmplTable to add a new column to the EmplTable: it will be used to set a variable background color user by user (the user linked to the employee).

Drag and drop the newly added field on the Administration Field Groups node of the EmplTable, so it will appear on the EmplTable form.

By now, you should see it on the Employee Details (Basic > Common Forms > Employee Details).

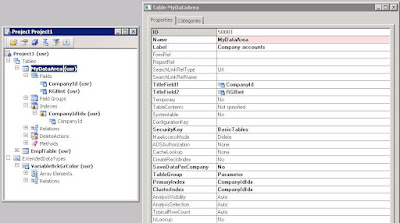
Step 3: Create a new Table for storing the colors by company account

Create a new Table MyDataArea. Drag and drop Extended Data Types CompanyId and RGBint on the Fields node. Add a primary index and set some table properties as below:

Add a find method:

static MyDataArea find(CompanyId _companyId
,boolean _forUpdate = false)
{
MyDataArea myDataArea;
;

if (_companyId)
{
MyDataArea.selectForUpdate(_forUpdate);

select firstonly myDataArea
where myDataArea.CompanyId == _companyId;
}

return myDataArea;
}
Add a findOrCreate method:
static MyDataArea findOrCreate(CompanyId _companyId)
{
MyDataArea myDataArea;
CompanyId companyId;
DataArea dataArea;
;

myDataArea = MyDataArea::find(_companyId);
if (myDataArea)
{
return myDataArea;
}

ttsbegin;

select firstonly dataArea
where dataArea.Id == _companyId;

if (!dataArea)
{
throw error("@SYS10666");
}

myDataArea.CompanyId = _companyId;
myDataArea.insert();

ttscommit;

return myDataArea;
}

Step 4: Modify the SysDataArea form


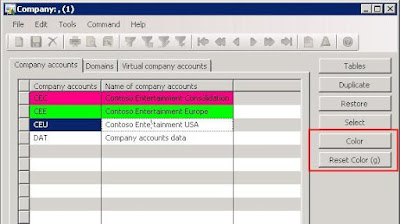
The Company Accounts form (Administration > Common Forms > Company accounts) should be modified as such that we can set up a different background color per Company account.


Override the displayOption method on the DataArea Data Source as follows:


public void displayOption(Common _record
,FormRowDisplayOption _options)
{
DataArea dataArealocal;
;

dataArealocal = _record;

if (dataArealocal.Id ==
MyDataArea::find(dataArealocal.Id).CompanyId)
{
if (MyDataArea::find(dataArealocal.Id))
_options.backColor(
MyDataArea::find(dataArealocal.Id).RGBint);
}
super(_record, _options);
}

Add two Button controls to the ButtonGroup control: one to set the color and one to reset the color.


Override the clicked method on the SetColor Button as follows:


void clicked()
{
common common;
container c;
int backColor = winapi::RGB2int(255,255,255);
MyDataArea myDataArea =
MyDataArea::findOrCreate(DataArea.Id);
;

c = Winapi::chooseColor(this.hWnd(),0,0,0,NULL);

if (conlen(c))
{
backColor = winapi::RGB2int(conpeek(c,1)
,conpeek(c,2)
,conpeek(c,3));
}

ttsbegin;
myDataArea = myDataArea::find(myDataArea.CompanyId
,true);
myDataArea.RGBint = backColor;
myDataArea.update();
ttscommit;

for (common = dataArea_ds.getFirst();
common;
common = dataArea_ds.getNext())
{
dataArea_ds.clearDisplayOption( common );
}
dataArea_ds.refreshEx(-1);

super();
}

Override the clicked method on the ResetColor Button as follows:


void clicked()
{
common common;
MyDataArea myDataArea =
MyDataArea::findOrCreate(DataArea.Id);
;

ttsbegin;
myDataArea = myDataArea::find(myDataArea.CompanyId
,true);
myDataArea.delete();
ttscommit;

for (common = dataArea_ds.getFirst();
common;
common = dataArea_ds.getNext())
{
dataArea_ds.clearDisplayOption( common );
}
dataArea_ds.refreshEx(-1);

super();
}

Step 5: Modify the SysSetupFormRun Class


Each form should have the chosen background color for the user who activated the functionality, so we’ll override the run method of they SysSetupFormRun class as follows:

public void run()
{
super();

this.design().colorScheme(FormColorScheme::RGB);

if (MyDataArea::find(curext()).RGBint
&& EmplTable::find(
EmplTable::userId2EmplId(
curuserid())).VariableBckGrColor)
{
this.design().backgroundColor(
MyDataArea::findOrCreate(curext()).RGBint);
}
}


Step 6: Set the background color


Open the Company Accounts form (Administration > Common Forms > Company accounts), click the Color button and set the background color by Company Account.


Check the Variable Background Color checkbox on the Employee form linked to your user account.
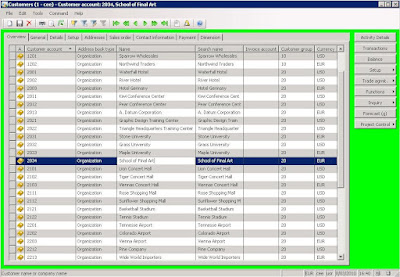

Result


The result should look like below for each form (below a screenshot of the Customers form):


Continue reading......

by Patrik Luca 1 comments

Patrik Luca, Ieper, BELGIUM
Feel free to use or spread all of the content on my blog. In return, linking back to my blog would be greatly appreciated. All my posts and articles are provided "AS IS" with no warranties.

Subscribe feeds via e-mail
Subscribe in your preferred RSS reader

Subscribe feeds rss Most Read Entries

Categories

Recommended Books


Subscribe feeds rss Recent Comments

This Blog is part of the U Comment I Follow movement in blogosphere. Means the comment field of this blog is made DOFOLLOW. Spam wont be tolerated.

Blog Archive

My Blog List

Followers

Links