My 2p about ERP Solutions, Information Worker Solutions and other software products (mainly Microsoft Dynamics AX and Microsoft SharePoint).

30 April 2009

Links List April 2009

I decided to share all my interesting reads and resources month by month with my blog readers. You can find these posts by searching on the label Links. I'll try to order the resources in logical categories. If you would like to see some interesting stuff added in the next month, don't hesitate to post a comment.

So this is my Links post for April 2009.


SharePoint - Design and Customization


SharePoint – Development and Programming


SharePoint – Search


SharePoint - Setup, Upgrade, Administration and Operation


Dynamics AX


Continue reading......

by Patrik Luca 0 comments

20 April 2009

Add url to the Description of a SharePoint Column

Introduction

If you want to add a url to the Description of a SharePoint Column, this cannot be done by adding HTML tags in the Description field of the Additional Column Settings of a SharePoint Column. HTML tags added in the Description of a column are rendered in plain text, so that is not an option.

You could achieve this though by use of the Content Editor Web Part and some JavaScript.

In next example, I have create an Issue Tracking SharePoint List. In this list, I have a Lookup column called Contact, which points to a Contacts SharePoint List, located in the same site, and at the same level as my Issue Tracking List. I want to add a hyperlink in the description of my Contact Lookup column of my Issue Tracking list to the NewForm.aspx page of my Contacts list to make it more user-friendly for end-users to find where they can add values for that Lookup column.

Step 1: Add the Content Editor Web Part to your NewForm.aspx

Open the NewForm.aspx page of your SharePoint list and add following parameters to the url: PageView=Shared&ToolPaneView=2, so your url looks like <…./Lists/yourlist>/NewForm.aspx?PageView=Shared&ToolPaneView=2.

You can now add the Content Editor Web Part to your NewForm.aspx page. Important is that you add the Content Editor Web Part below the already existing Web Part on your NewForm.aspx page, since we will add some JavaScript to the CEWP to manipulate the input fields. They should already by rendered before we execute our JavaScript.

Step 2: Add the JavaScript in your CEWP

Adding JavaScript in your CEWP can be done by chosing Edit>Modify Shared Web Part and clicking the Source Editor button to the right.

First we add a function to search the column to which we want to add the url to help our SharePoint users. This function I’ve already used in another post: How to set default values based on a query string and make those fields uneditable.

function getTagFromIdentifierAndTitle
(tagName,identifier,title){
var len=identifier.length;
var tags=document.getElementsByTagName(tagName);
for(var i=0;i<tags.length;i++){
var tempString=tags[i].id;
if(tags[i].title==title && (identifier=="" ||
tempString.indexOf(identifier)==
tempString.length - len)){
return tags[i];
}
}
return null;
}


Next we add an element with tag a to the Document object, to add a hyperlink text. This can be done with code as below:


var myLink = document.createElement('a');     
// The contacts list is located in the same site on the same level
// as the list for which the hyperlink is added to a column in
// the NewForm.aspx page here
myLink.href = "/../../Lists/Contacts/NewForm.aspx";
// Open the hyperlink in a new browser window
myLink.target = "_blank";
// Text of the hyperlink
myLink.innerText = "Create New Contact ";

With the following code, we search the SharePoint column on the NewForm.aspx page whose field’s display name equals Contact. The type of the SharePoint column is Lookup. More information about this code can be found in a post on the Microsoft SharePoint Designer Team Blog: Using Javascript to Manipulate a List Form Field.


var theSelect=
getTagFromIdentifierAndTitle("select","Lookup","Contact");
// if theSelect is null, it means that the target list
// has more than 20 items, and the Lookup is being
//rendered with an input element
if(theSelect==null)
{
var theInput=getTagFromIdentifierAndTitle("input"
,"","Contact");   
// Add the previously created hyperlink in front
//of the SharePoint column
  theInput.insertAdjacentElement('beforeBegin',myLink);
}
else

  theSelect.insertAdjacentElement('beforeBegin',myLink);
}


Putting it all together, our added JavaScript in the CEWP should look like this:


<script language="JavaScript">

function getTagFromIdentifierAndTitle
(tagName,identifier,title){
  var len=identifier.length;
  var tags=document.getElementsByTagName(tagName);
  for(var i=0;i<tags.length;i++){
    var tempString=tags[i].id;
    if(tags[i].title==title && (identifier=="" ||
       tempString.indexOf(identifier)==
       tempString.length - len)){
      return tags[i];
    }
  }
  return null;
}

var myLink = document.createElement('a');
// The contacts list is located in the same site on the same level
// as the list for which the hyperlink is added to a column in
// the NewForm.aspx page here
myLink.href = "/../../Lists/Contacts/NewForm.aspx";
// Open the hyperlink in a new browser window
myLink.target = "_blank";
// Text of the hyperlink
myLink.innerText = "Create New Contact   ";

var theSelect=
getTagFromIdentifierAndTitle("select","Lookup","Contact");
// if theSelect is null, it means that the target list
// has more than 20 items, and the Lookup is being
//rendered with an input element
if(theSelect==null)
{
  var theInput=getTagFromIdentifierAndTitle("input"
  ,"","Contact");   
  // Add the previously created hyperlink in front
  //of the SharePoint column
  theInput.insertAdjacentElement('beforeBegin',myLink);
}
else

  theSelect.insertAdjacentElement('beforeBegin',myLink);
}
</script>

The result will look like this:


Remarks


  • The great point about this modification is that our NewForm.aspx page isn’t unghosted. So adding new columns to our list in the future will become availalbe straight away in our NewForm.aspx page.


  • You could put the code in an external JavaScript file, so you can run it on several pages. This way, you should also maintain your code on only one place. If you’ve put your code for example in an external file called HyperlinkNewForm.js and uploaded it in the Site Collection Documents library, you can replace the code in the CEWP added to your NewForm.aspx as follows:

    <script language="JavaScript" 
    src="http://<webapplurl>/SiteCollectionDocuments/
    HyperlinkNewForm.js">
    </script>


Continue reading......

by Patrik Luca 27 comments

16 April 2009

Suppress Overwrite question while running Dynamics AX report with output to a file

Introduction

Suppose you want to run a Dynamics AX report, and save the output to a file, for example a PDF file. This can be done easily by clicking the Options button when running the report. Next you can choose Send to File, and you can specify the File name and File format.

If we do this for example for the Customer turnover report (Accounts receivable>Reports>Statistics>Customer>Customer turnover), then your input should look like below and you’ll receive a nice PDF file.

Problem Description: infolog asking to overwrite the existing file

If you run the report twice with the same File name, you’ll get a infolog mentioning the File <filename> already exists. Overwrite?

This could be a problem if you had chosen to run the report in Batch, for example every night. This Overwrite question will prevent the report of generating the output File, since it will be waiting for a user interaction to confirm the existing file can be overwritten.

Solution: Modify init method and modify RunOn property

To suppress this overwrite question, follow the two steps as below:

  1. Step 1: Add following code to the init method of the report.

    public void init()
    {
    super();
    // suppress overwrite message
    element.printJobSettings().warnIfFileExists(false);

    }


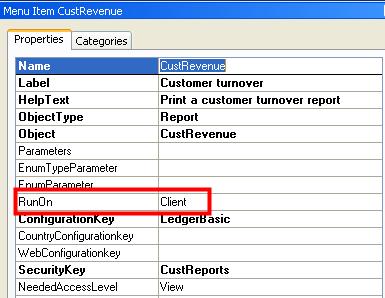
  2. Step 2: Modify the RunOn property of the corresponding Menu Item so its value equals Client. In our example we’ll modify the Menu Output Item CustRevenue as in below screenshot.


Continue reading......

by Patrik Luca 3 comments

08 April 2009

Problems after farm restore

Introduction

I had to do a topology change for a Microsoft SharePoint Server 2007 installation. The MOSS 2007 installation was currently on one physical server. The change implied splitting off the Database Server to another physical server, and keeping the original physical server as Web-Front End Server and Application Server.

So I started a set of taks:

  1. I performed a farm level backup using the backup utility in SharePoint Central Administration.
  2. I ran the SharePoint Products and Technologies Configuration Wizard to disconnect the server from the configuration database.
  3. I ran the Wizard again to create a new SharePoint farm.
  4. I launched the Office SharePoint Services Search and Windows SharePoint Services Search services.
  5. I restored the farm backup.

All of which went pretty well, till I started doing some test: I ran into several problems.

Problem 1: The search service is currently offline

My search wasn’t functioning. Clicking on the Search Settings link in the Search section of my Shared Services Provider, I got following error: The search service is currently offline. Visit the Services on Server page in SharePoint Central Administration to verify whether the service is enabled. This might also be because an indexer move is in progress.

I restarted a couple of hundred times the search services, both in the SharePoint Central Administration, Operations sections as in the Services tool to start and stop Windows services under Administrative Tools on the Application Server . I relinked the indexer too couple of times, all without result.

Solution: Create a new Shared Services Provider

It all ended up by creating a new Shared Services Provider and change association of my restored Web Application to the newly created Shared Services Provider.

Off course, I deleted my restored Shared Services Provider too and had to reconfigure some settings in my newly created Shared Services Provider.

After this having done, my search service was functioning again in my new topology.

Problem 2: Alerts were not arriving

Alerts were not arriving anymore after the farm restore. After a while, I noticed the Immediate Alerts Timer Job Definition was missing (Central Administration > Operations > Timer Job Defintions).

Apparently, this Timer Job Definition was not restored upon a full farm restore…

Solution: Add the Immediate Alerts Timer Job Definition

Adding the Immediate Alerts Timer Job Definition could be done by running following instruction at the command prompt:

stsadm –o setproperty –pn job-immediate-alerts 
–pv “every 5 minutes between 0 and 59” –url <url>

And hey, alerts were arriving, and the Immediate Alerts Job appeared again in the Timer Job Definition list.


Problem 3: Other Timer Job Definitions missing


While I was looking for the missing Immediate Alerts Job missing, I remarked there were some other Jobs missing too after my farm restore. Following was the list of missing Timer Job Definitions:


  • Change Log

  • Database Statistics

  • Dead Site Delete

  • Disk Quota Warning

  • Recycle Bin

  • Usage Analysis


Solution: Running some other stsadm commands


I tried to use the same trick as for the Immediate Alerts Job, which worked for the Dead Site Delete and Usage Analysis Timer Job Definitions: they re-appeared. Unfortunately, I didn’t find how to let the others re-appear.

To fix the 2 Timer Job Definitions which I managed to let re-appear, run following commands at the command prompt:


stsadm –o setproperty –pn job-dead-site-delete
-pv “Daily at 00:00:00” –url <url>


stsadm –o setproperty –pn job-usage-analysis –pv
”Daily between 00:00:00 and 23:45:00” –url <url>


Continue reading......

by Patrik Luca 2 comments

Patrik Luca, Ieper, BELGIUM
Feel free to use or spread all of the content on my blog. In return, linking back to my blog would be greatly appreciated. All my posts and articles are provided "AS IS" with no warranties.

Subscribe feeds via e-mail
Subscribe in your preferred RSS reader

Subscribe feeds rss Most Read Entries

Categories

Recommended Books


Subscribe feeds rss Recent Comments

This Blog is part of the U Comment I Follow movement in blogosphere. Means the comment field of this blog is made DOFOLLOW. Spam wont be tolerated.

Blog Archive

My Blog List

Followers

Links